Bite Splint


Contents

Overview

To define a bite splint case in the DentalDB, click on the tooth [1], and in the window that pops up, select the option Bite splint [2].

Afterward, select the type of Material [3] and choose under Bite splint mode [4] one of the following:
- Standard [A]
- Standard - fill gap for missing tooth [B]
- Anatomical - use anatomy from tooth library [C]

Bite splint mode

Standard [A] - select this option for regular bite splints without gaps between existing teeth.
Standard - fill gap for missing tooth [B]- use this option when there is a gap between existing teeth to avoid a depression in the bite splint over an edentulous area.
Table top - use anatomy from tooth library [C] - select this option if you wish to use anatomical shapes from tooth library.
See section "Defining jobs for individual teeth" for details.
| Remember that while clicking on a tooth, you can hold <Ctrl> to apply the last selection to another tooth or <Shift> to apply the selection to a group of teeth - similar to marking several files in Windows Explorer |

Define the type of antagonist scan by using the pull-down menu and choosing the appropriate one: Bite impression (unlikely to be useful for bite splints), Registered jaw (without articulation), Type A or Type S.
Simultaneous design of splints in both arches
The simultaneous design of the splints in the upper and lower jaw saves time and enables easy matching and adjustment of both splints.
- In the job definition, select Bite splint mode in the upper and lower arches. Then, proceed as usual.

Automated bite splint design
Using the Cloud services and the Multi-Tooth-Segmentation, the bite splint curve is automatically created enabling a semi-automatic workflow that saves time.

- Start by defining the bite splint restoration as described above. Then, click Design [1] to open DentalCAD.

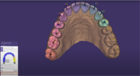
- If you have enabled online Cloud services [2], once you start DentalCAD, the wizard automatically starts segmenting the teeth. The diagram [3] shows the status of the segmentation.

- Once the segmentation is completed, in blue [4], the segmented teeth will be represented in different colors. You can skip a missing tooth [5], define a tooth by clicking on it [6], or restart the auto-segmentation [7] process if needed. Use the arrow [8] to adjust the long axis of the tooth, and its automatically re-calculated according to the new axis.

- Switch to the Correction [9] tab to make any necessary adjustments. Note that before doing so, you need to select the specific tooth in the “Automatic” tab. Alternatively, you can click on the arrow [8] of the long axis of the tooth, and it will switch to that tooth. Use the Draw [10] tool and the brush, clicking to mark areas belonging to the tooth. To deselect areas, hold the Shift key and click. Adjust the brush size using the slider [11] or by holding Shift and using the mouse wheel. Click the Apply [12] button to include the new changes. If necessary, you can restart [13] the correction process. Ensure all teeth are correctly segmented before moving forward.

- Then, continue to the Design the bite splint bottom [14] step as usual.

- Click next, and enter the virtual articulator [15] wizard step.

- In the next step, Design the bitesplint top, the software automatically detects the margin line using the Cloud services [16].

- Once that’s done, you can change the Margin Detection Parameters [17] by clicking the arrow, and make specific adjustments. Use the dropdown menu [18] to select one of the options. You can choose from a number of options described in detailed here. With the Offset up/down [19], adjust where you want your margin line to be. After adjusting the parameters, click Detect margin [20] to recalculate the margin line according to your preferences. Then, adjust the SurfaceProperties [21].

- Then, continue to the Free-form Bite Splint [22] Top as usual.

- Finally, you can Merge and Save restorations [23].