Defining jobs for individual teeth


Contents
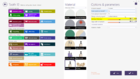
By clicking on a tooth in the DentalDB main window, you can select the type of restoration that will be designed for this tooth. The following dialog will appear:

The restoration types
First, select the type of restoration on the left [1]. The following types are available (the list may vary depending on your special configuration and the add-on modules you have purchased):
- Crowns and Copings
- Anatomic crown - A full contour crown.
- Coping - A coping derived from the full anatomic shape (using cutback to create space for ceramic). First, the anatomic shape is designed; then, it is shrunk to create the coping. The "Shrinking" controls the amount of cutback.
- Pressed crown - A two-part restoration, where the framework will be designed as an anatomic coping; additionally, a second part is created, which contains the chewing surface of the restoration – to be milled in wax/PMMA, later to be burned out ("overpress").
- Eggshell crown (Provisional) - an eggshell temporary that is designed preoperatively, using scans of non-prepared teeth.
- Overlay- (three-quarter crowns/ onlay crowns) allows a design on complex preparation margins in combination with a concave preparation shape.
- Offset coping - A simple coping with a fixed thickness above the preparation. It is deprecated to use this; "Anatomic coping" is usually the better choice, as it gives support to the cusps from the framework. Use only if your customer specifically requests this, or if the operator does not have significant dental know-how to design a proper anatomic coping for the respective patient situation.
- Please see Screw Retained Bridge Design: How to deal with non-ideal implant placement for important considerations when setting up cases for screw retained bridges
- Pontics and Mockup
- Anatomic pontic - A full contour pontic. By default, pontics are connected to adjacent restorations of the same material.
- Reduced pontic - A pontic derived from the full anatomic shape, using cutback to create space for ceramic.
- Pressed pontic - A two-piece pontic consisting of a framework and full contour over-press part.
- Eggshell pontic (Provisional) - A full contour pontic that is designed preoperatively, using scans of non-prepared teeth.
- Mockup - A full contour or veneer snap on reconstruction. Used as a prototype or try in.
- Inlays, Onlays, and Veneers
- Inlay – an Inlay or Onlay with full anatomy.
- Offset inlay – a framework for an inlay with a fixed thickness.
- Veneer – a Veneer restoration over a prepped tooth(full anatomic).
- Digital Copy Milling
- Waxup – replication of a scanned part by digital copy milling.
- Anatomic waxup – a full contour crown created from a full anatomic wax model over a prep (digital copy milling).
- Reduced waxup – a framework full derived from an anatomic wax model with cutback for porcelain.
- Pontic waxup – a full contour from anatomic waxup over a missing or extracted tooth.
- For Waxup and Waxup reduced, select only the teeth with preparations.
- See section "Understanding the difference between Pre-op and Waxup feature" to learn more about the waxup feature and to understand in which way it differs from "pre-op scan" usage.
- See section "Input data requirements for Waxup feature" for more info on what the specific input data requirements are for the "waxup" feature.
- Removables and appliances
- Full denture - a full denture, for fully edentulous cases using standard tooth libraries.
- Partial Denture - used to define a partial denture framework case.
- Bite Splint - a device to expand or correct bites, can be used for custom night-guards and sports-guards.
- Primary telescopic crown – primary part for a removable structure (telescopic crown).
- Secondary telescopic crown – Secondary part for a removable structure (telescopic crown).
- Attachment – an extra-coronal attachment.
- Bars
- Bar Pillar – the portion of a bar that connects to the implant.
- Bar Segment – the portion of a bar that provides the connection between the pillars.
- Offset substructure - framework for a substructure with a fixed thickness.
- Residual Dentition
- Antagonist – define this in the opposing jaw of your restorations to use an antagonist scan.
- Adjacent tooth – a healthy tooth that is to be scanned, but not to be restored in any way.
- Omit in bridge – a tooth that is missing and is not to be restored. You need to define this in order to be able to place connectors between teeth that are "normally" not next to each other. E.g. to create a bridge with teeth 14-16-17, define 15 as "Omit in bridge".
Note that you also need to define the antagonist scan type (Bite impression scan, or scan of two stone models – [8] in the main window).
| Very often, one job contains several restorations of the same type. You don't need to open the above dialog for each separate tooth – just define the details for one tooth, close the dialog, then hold <CTRL> and click other teeth to apply the same settings. Hold <SHIFT> and click to apply the same settings to several teeth at once (similar to marking files in Windows Explorer). You can also click the tooth already defined, hold the click, and drag the same settings to another tooth. |
Available substructure-design types

Selecting production method
Next, select the production method [2]. Typically, you can choose between 3/4-axis milling or 5-axis milling/laser melting. The main difference is that for 3/4 axis milling, a unique insertion axis is enforced for all elements of a bridge. The exact descriptions in the drop-down box [2] may vary depending on your configuration; e.g. the options may allow you to choose between inhouse production and outsourced production via a milling center. In some configurations, the selection box [2] may be absent altogether.
Material selection
Now, select the Material [3]. This will adjust production parameters (including their minimum and maximum values) to match the material's specifications. Note that list of materials available depends on the type of construction [1] and the production method [2].
| Do not change the material if you have already finalized the construction, or plan to use a previously saved CAD scene, as the output data will then not take into account the changed material parameters. Duplicate the case instead. |
Setting further options (implant type, additional scans)
Once you have selected the material, the right part of the dialog gives you the possibility to adjust additional details:
- Material shade [4]: Choose the tooth shade of the reconstruction.
- Implant-based [5]: Choose whether this is an implant-based reconstruction, and of which type.
- Custom Abutment: A custom abutment will be designed, in addition to the selected restoration (e.g the coping).
- Screw Retained: The construction will be screw-mounted on the implant, without using an abutment.
- On stock abutment : Design implant-based restorations based on stock abutment libraries. The crown on top of the stock abutment will be designed without an emergence profile and screw channel.
- Post and Core [6]: Design Post and Core, as well as final restorations in a single workflow for fast and functional root canal treatment. It requires a separate module activation. Please contact your reseller.
Note that these options require the purchase of the implant module.
- See "Understanding the difference between Pre-op and Waxup feature" to learn more about the "Pre-op scan" feature, and understand in which way it differs from the waxup "digital copy milling".
- On substructure scan: The reconstruction will be designed over a previously design reconstruction (e.g bar).
- Pre-op model [7]: Choose whether you'd like to use a pre-op model scan for this tooth.
- Extra gingiva scan [8]: Choose whether you'd like to use an additional scan for the gingiva mask.
- Show advanced parameters [9]: Adjust the advanced parameters of a material and it will be saved for future cases of the same client selecting the same material.
Values you changed, so that they differ from the standard setting, are displayed with red background.
Setting numeric parameters, storing dentist-specific default values
Furthermore, numeric parameters can be adjusted. All adjustments to numeric parameters that you make here in the DentalDB module will become the default values for the selected client/dentist when using this particular material/construction. E.g. if the default value for cement gap is 0.05mm, but one of your clients prefers a more loose fit, adjust it to a higher value like 0.08mm, and this will become the new default value whenever this combination of construction/material is used for the currently selected client/dentist in the future. To make this behavior more obvious, a color-coding is used for the background of the slider:
- Red background: You have just changed this parameter and it will become the new default value.
- Yellow background: This value was previously changed and you are now using the stored default value.
- White background (as shown in the screenshot above): The value displayed is the global default value and not a dentist-specific setting.
| To adjust parameters for just one construction, without affecting dentist-specific default values, adjust the respective value during the CAD process, and not in the DentalDB module. To clear all stored default values for a specific dentist, use the "Clear client-specific defaults" in the Edit dialog (click [2] in the main DentalDB screen to access this dialog). |
Closing the dialog
To apply your settings, click "Ok" [9]. To abort without applying your changes, click the arrow [8] To delete a tooth selection you made erroneously, click "Clear" [10], then "Ok".
Work type selection style
There are available two styles for the work type selection you can choose from according to your preference.
Colorful (left side), which uses a colored filling to differentiate the work types, or Minimalistic (right side), which uses a colorful frame only.

This option is available in Settings under the User interface section, selecting Work type selection style.
