Contents
- 1 Choosing the right type of integration
- 2 Automatic iTero-exocad scan transfer to design station via MyiTero.com
- 2.1 How to set up the iTero-exocad Connector™?
- 2.2 What if the pop-up window doesn't show up at the start of DentalDB?
- 2.3 Understanding the difference between lab and clinical account
- 2.4 Switching from lab account to clinical account, or vice versa
- 2.5 Disabling iTero-exocad Connector™
- 2.6 Disabling the MyiTero window on start of DentalDB
- 2.7 Disabling a previously enabled MyiTero integration
- 3 LAN-based scan transfer
- 4 Understanding & troubleshooting material mappings
Choosing the right type of integration
This page documents the setup for integration between iTero Element intraoral scanners and exocad DentalDB/ChairsideDB. For an in-clinic setup, there are two different options to connect your iTero Element scanner to exocad software running on a separate design station:
- Through MyiTero.com: Scans will be uploaded from your scanner to the MyiTero scanner via internet, and will be downloaded on the design station. This is easy to set up, and will work in any environment where both scanner and design station have reliable and fast access to the internet. The setup is described below, and it works similarly to the clinic-lab connection with the iTero-exocad connector.
- Through local network: Scans will be transferred from the scanner to the design station through the local network. This is fast, independent of the speed of the internet connection, but is more complex to set up, and requires full control over the network (e.g. in order for this setup to work, it must be ensured that the scanner and design station can communicate via LAN, and no firewall interferes with data transfer via SMB protocol)
Automatic iTero-exocad scan transfer to design station via MyiTero.com
How to set up the iTero-exocad Connector™?
On first start, the ChairsideDB/DentalDB software opens a pop-up window inviting you to set up the MyiTero integration. Choose the correct option for your iTero account:
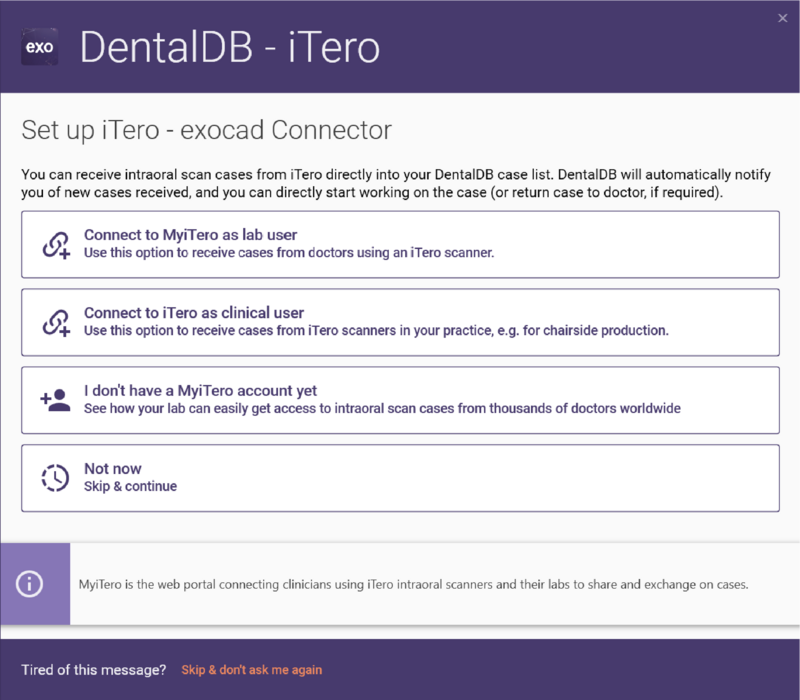
Click Connect to iTero as a clinical user if you have a clinical MyiTero account. If you have a lab account, click Connect to MyiTero as lab user. See here for details on the difference between clinical and lab account usage.
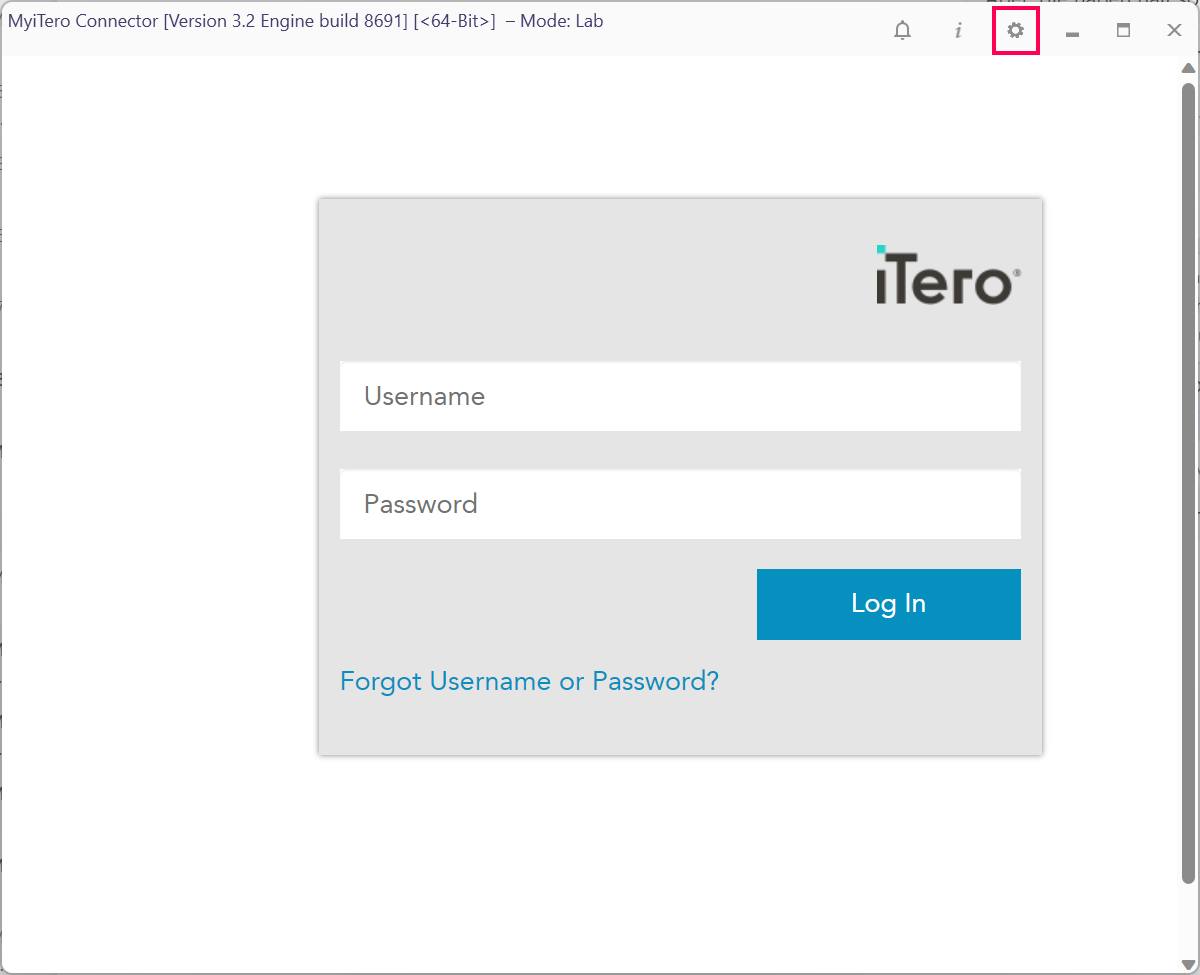
Both options will redirect you to a login screen, where you can enter your MyiTero credentials:
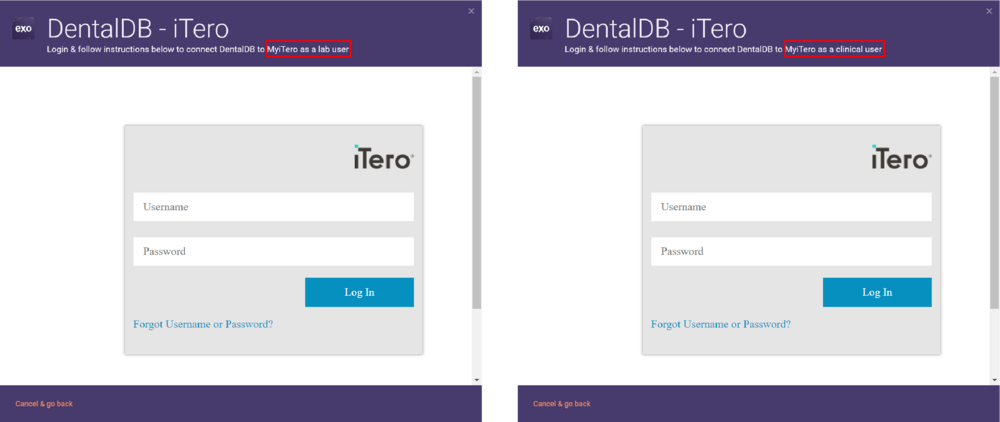
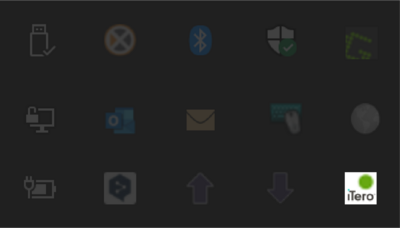
Cases that were never opened before are marked as "Unread", so that you can easily discern between new cases received and your old cases. An icon will show up in the Windows tray if the iTero connector is started. A green dot on the icon indicates that the connection is active and working.
What if the pop-up window doesn't show up at the start of DentalDB?
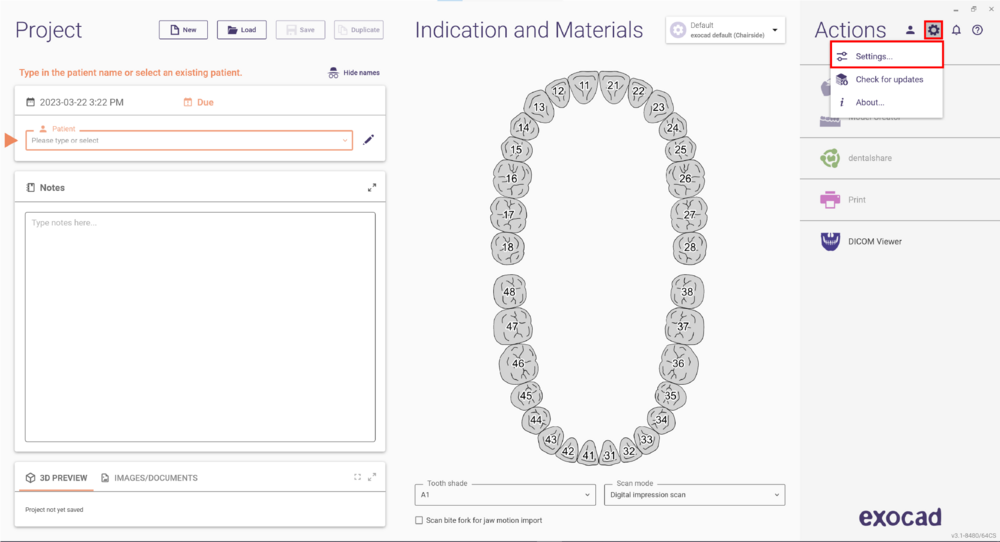
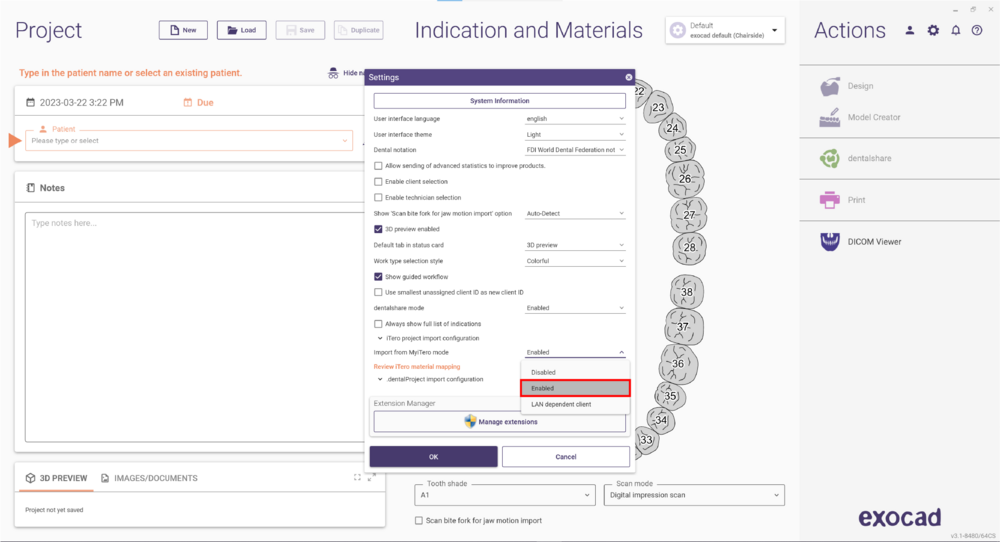
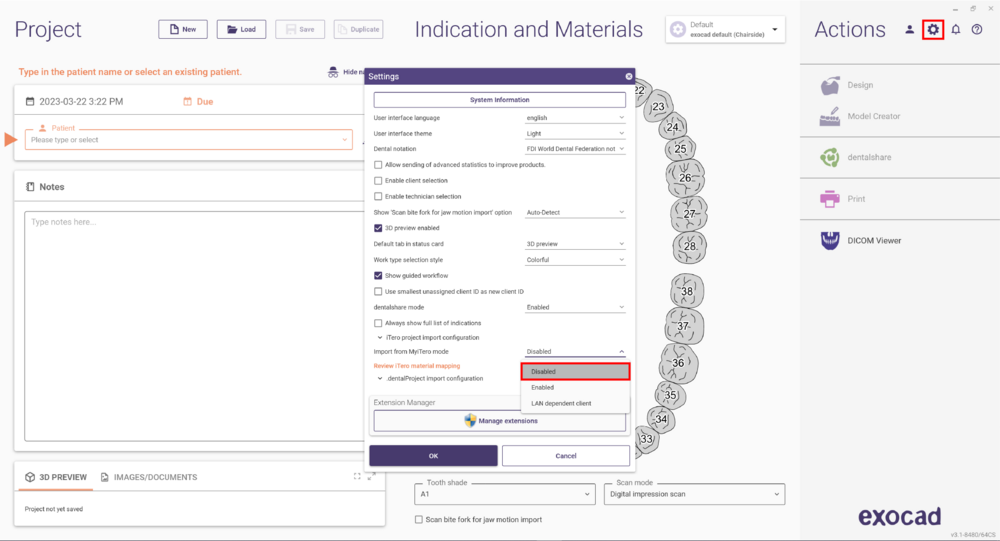
If you have skipped/disabled MyiTero connection, then DentalDB will start without showing the MyiTero connection screen. You can simply re-enable the iTero exocad Connector™ by clicking on "Settings" in DentalDB, and then setting MyiTero import to "Enabled".
On the next start of the software, you will see the MyiTero login screen pictured above, where you can enter your credentials and log in.
Understanding the difference between lab and clinical account
Whether you should use the "clinical" or "lab" user option depends on your type of iTero account (doctor or lab). The lab/clinical option also affects which cases are sent to the design station:
- Which cases will be transferred to ChairsideCAD/DentalCAD as a Clinical user?
All cases that have "exocad Chairside" in “Send to:” will be auto imported. Therefore, make sure to have the Send to: always set to "exocad Chairside" for cases you'd like to auto-import on the machine running exocad ChairsideCAD 3.1 Rijeka or DentalCAD 3.2 Elefsina (and above), as pictured below:
- Which cases will be transferred to DentalCAD as Lab user?
All cases that have been assigned to your lab, that as a lab you can download on myiTero.com for Labs, can be auto imported on the machine running exocad DentalCAD (or ChairsideCAD) Rijeka 3.1 and above.
Switching from lab account to clinical account, or vice versa
If you have configured MyiTero connection for a lab account, but wish to use it with a clinical account, or vice versa, you can switch accounts with the following steps:
- Open the iTero Connector window using the tray icon (as pictured on the right below). If iTero-exocad connector is running, but you don't see the icon, you may have to unfold additional tray icons by clicking on the Chevron (pictured on the left below)
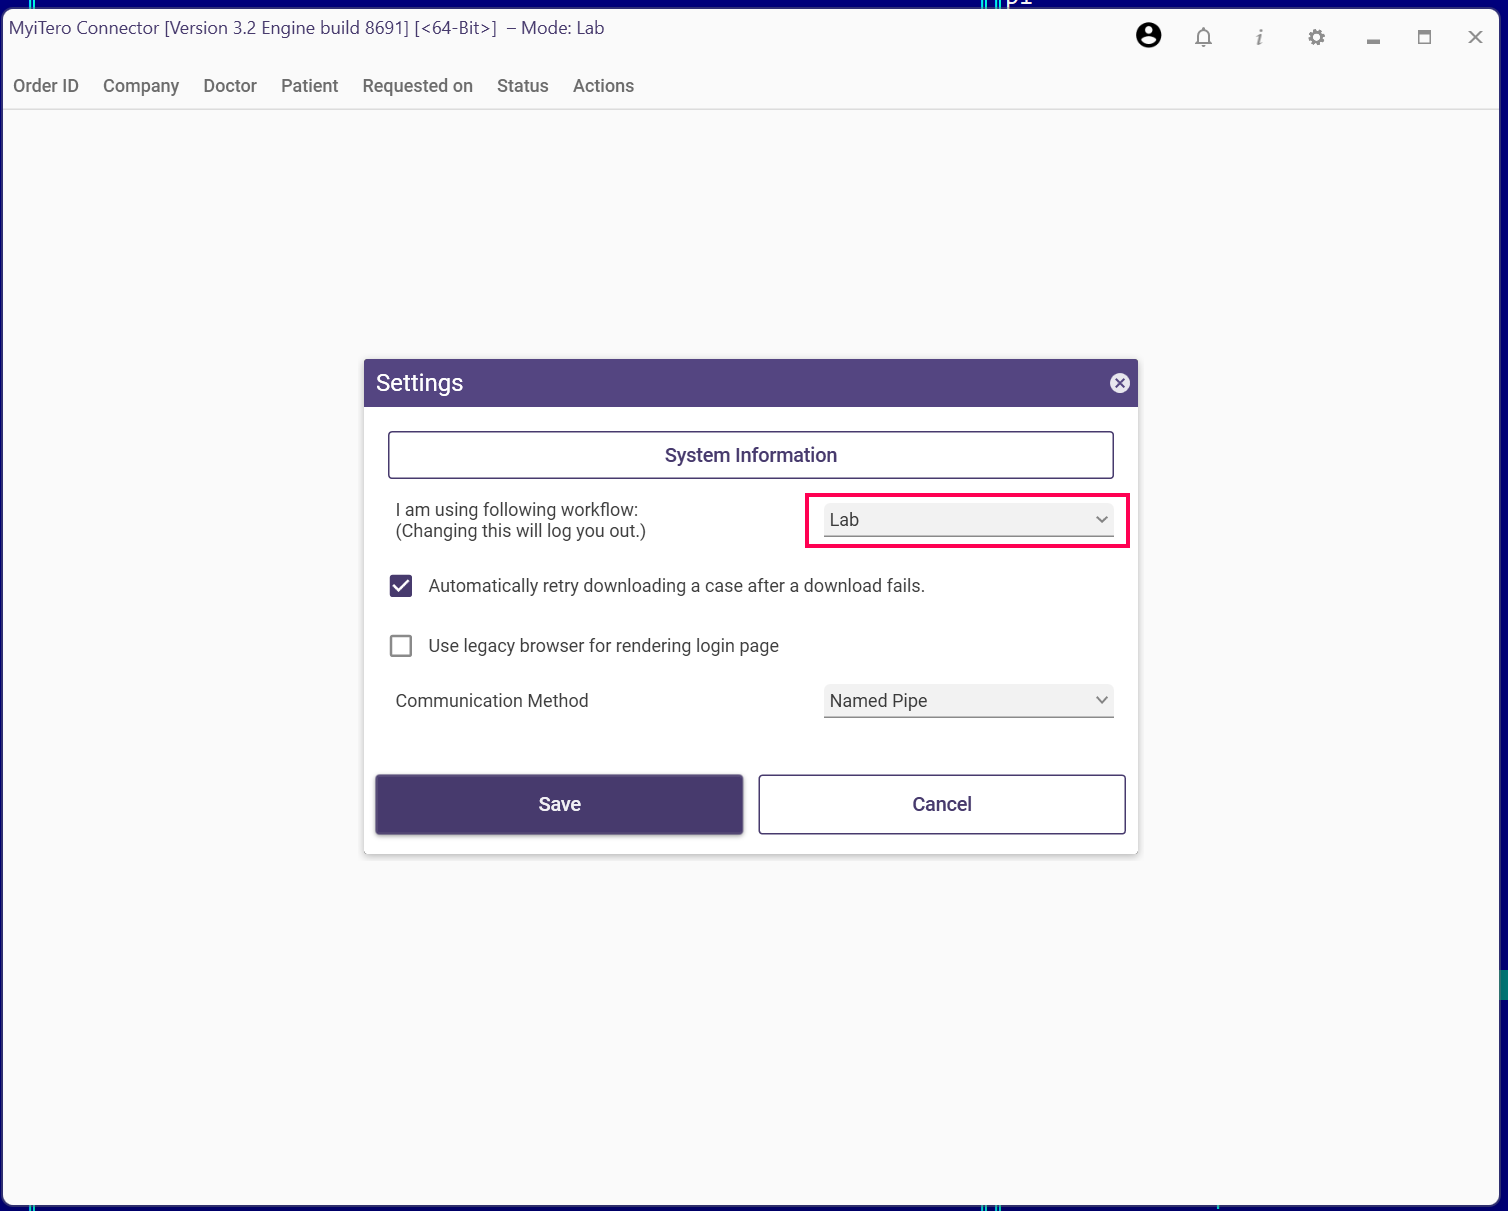
- Open the settings dialog, by clicking on the gear icon on the top right:
- Chose the desired workflow mode that matches your iTero account (lab or clinical):
Disabling iTero-exocad Connector™
Disabling the MyiTero window on start of DentalDB
If you do not wish to connect your exocad installation to MyiTero, you can simply click "Skip & don't ask me again" in the dialog:
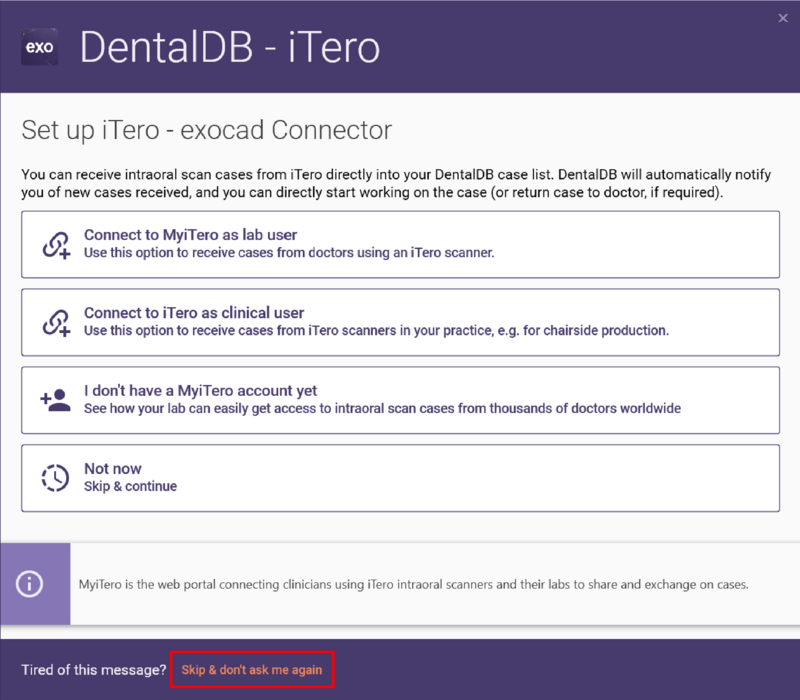 The dialog will not show up again.
Disabling a previously enabled MyiTero integration
If you have already enabled MyiTero integration, and wish to disable it, open the Settings window and set MyiTero integration to "Disabled":
You can re-enable MyiTero integration at any time, as described above.
LAN-based scan transfer
The following documents the setup for integration between iTero Element intraoral scanners and exocad DentalDB/ChairsideDB, for the following setup:
- You wish to transfer cases from scanner to design station via LAN
- A separate PC is used to run exocad software (e.g. a CAD/CAM PC connected to the milling machine), that is connected to the same network (LAN) as the iTero Element.
- The PC runs exocad ChairsideCAD or an exocad DentalCAD release from 2018 or later
What you'll get
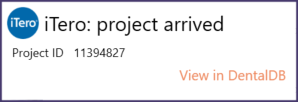
Once the integration is properly set up, Chair-side milling cases scanned on the iTero element will automatically be added to the case list in exocad, without needing to manually importing them. On the CAD/CAM PC on which exocad DentalDB/ChairsideDB runs, the user will be notified of new incoming cases with a notification message such as this:
Aside from the scan data, additional information like the selection of indication, material select, etc will also be transferred automatically.
Which cases will be transferred
All cases that have "Case Type" set to "Chair Side Milling" in the case setup will be auto-imported. Therefore, make sure to have the type always set to "Chair Side Milling" for cases you'd like to auto-import on the machine running exocad, regardless of whether you use exocad ChairsideCAD exocad's lab software on that computer.
Setup
The following steps only need to be done once, for the initial setup.
What to do on the iTero element
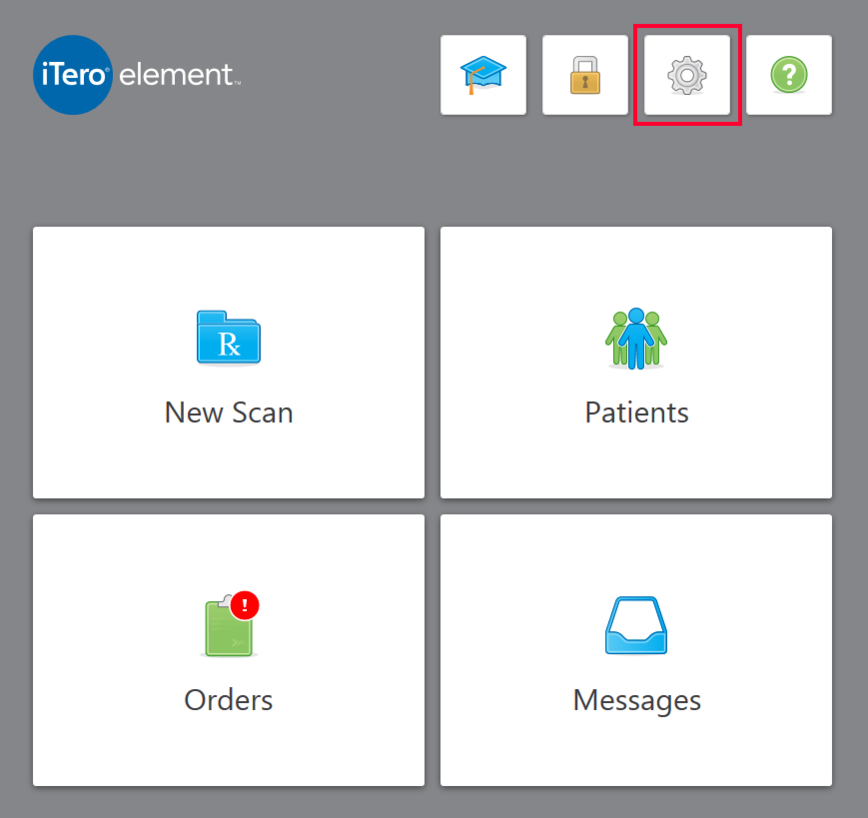
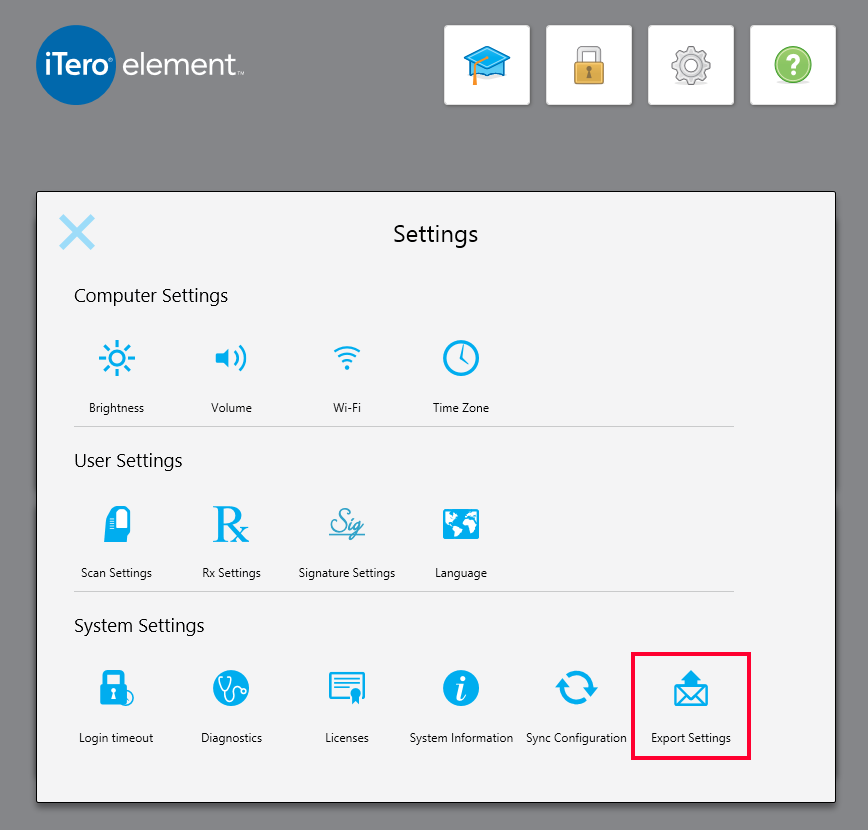
1. Log in to your iTero element. From the main screen, tap the gear icon to open the settings screen:
2. On the settings screen, tap "Export settings":
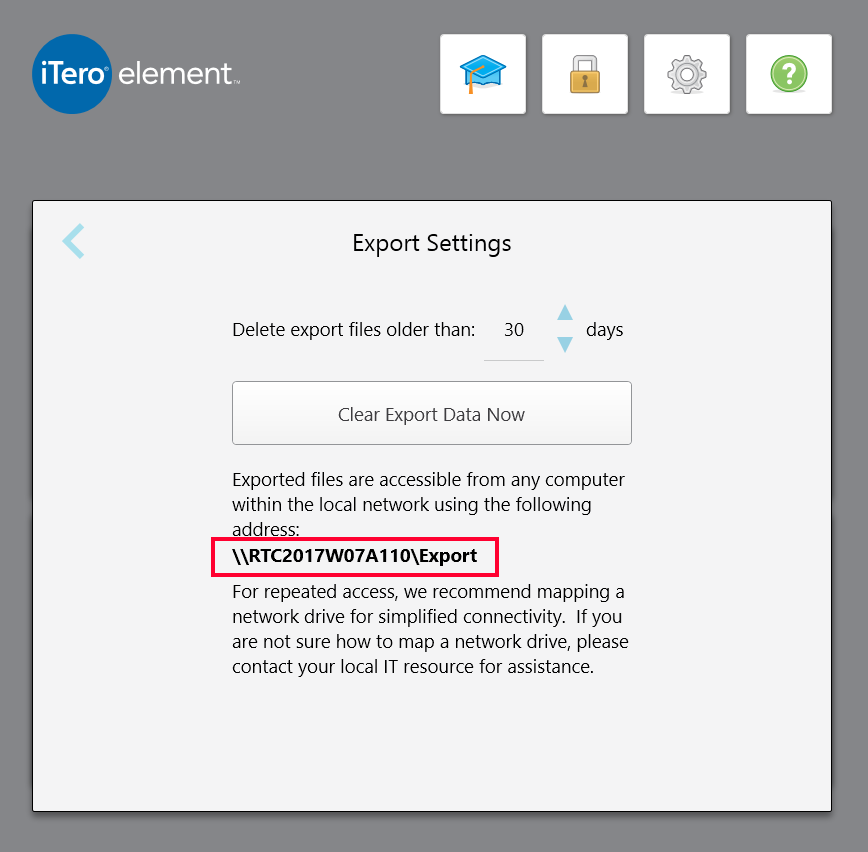
3. On the following screen, note the local network address displayed in bold letters (starting with "\\"). You will need to enter this address on the CAD/CAM PC later on, as described below.
What to do on the CAD/CAM PC that runs exocad software
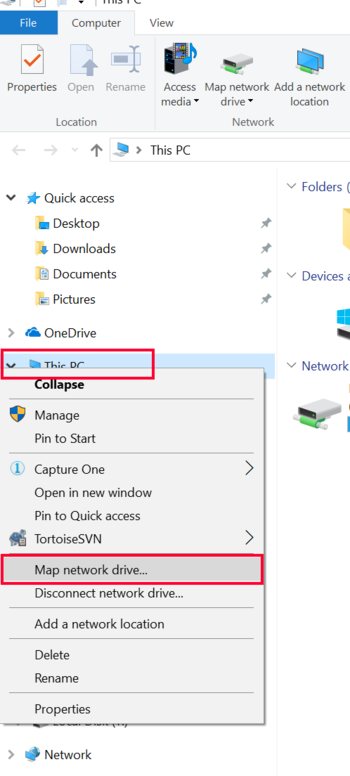
4. Now, we start setting up the iTero's Export Folder as Network Drive on the CAD/CAM PC. To do so, open Windows Explorer (e.g. using hotkey Windows+E), and right-click on "This PC". Then, click "Map network Drive":
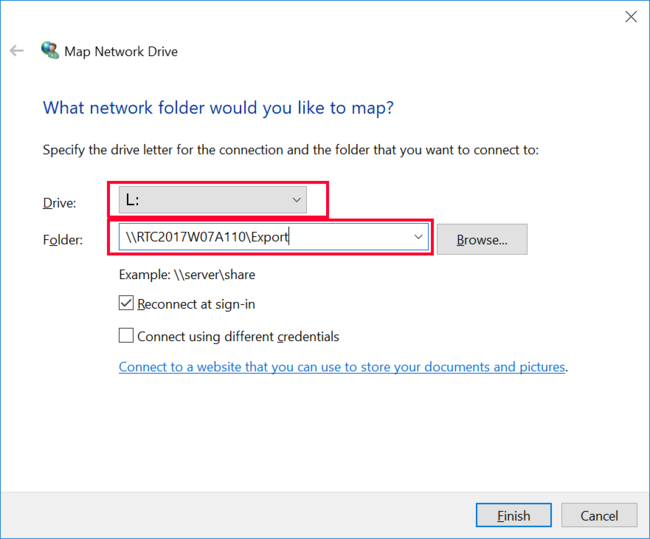
5. In the next screen, select a drive letter that's available from the "Drive:" drop-down box, e.g. "L:". Next to "Folder:", type in the exact network path that you've noted in step 3.
6. Click "Finish". The network drive setup is now completed.
7. Next, please open exocad DentalDB or ChairsideDB, respectively. Click the "Settings" link in the lower left of the screen (if the DB application is already running, click the "New" button to start a new case and thus expose the "Settings" link).
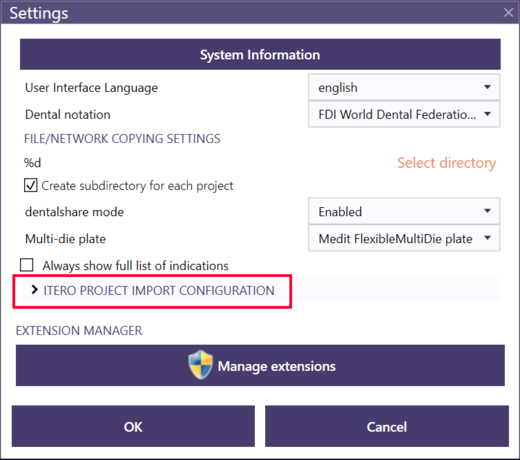
8. In the ChairsideDB/DentalDB settings screen, unfold the "ITERO PROJECT IMPORT CONFIGURATION" section by clicking on it:
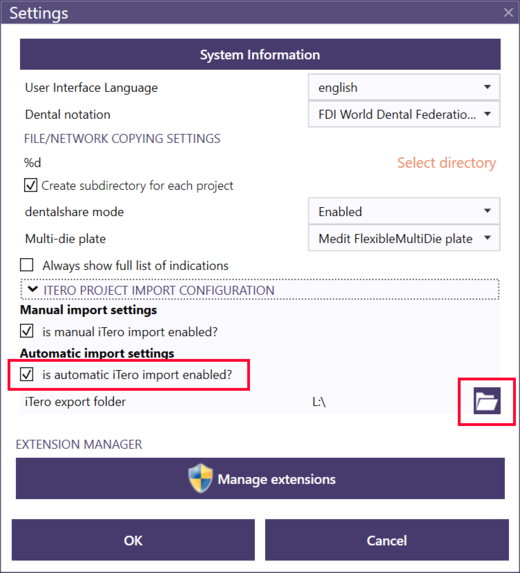
9. Ensure that "automatic iTero import" is enabled. Then, click the folder icon on the lower right.
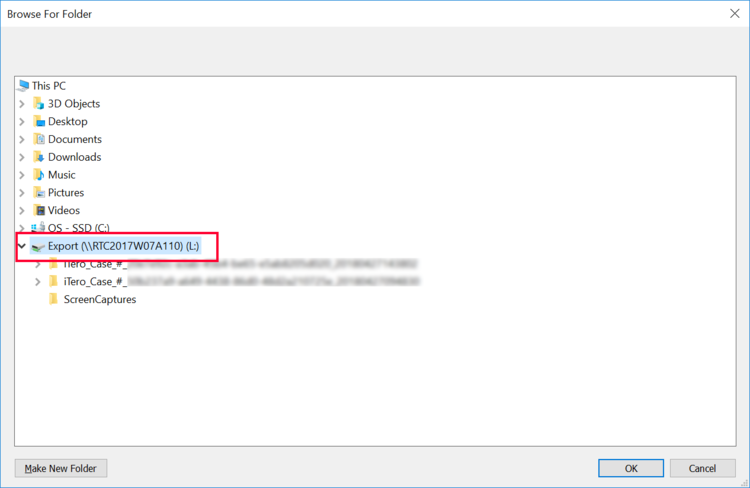
10. Select the drive you've previously mapped, e.g. "L:":
11. Confirm with "OK", then "OK" again.
12. Done! Automatic case transfer should now be working.
Additional information
Required exocad configuration options for exocad to enable this import feature
iTero auto-import is available in exocad ChairsideCAD and in DentalCAD 2.2 Valletta (or later). However, certain options must be set in the DentalDB configuration, for this automatic import to work - as the auto-import is disabled by default. These are set in the XML file DentalDB\config\settings-db.xml. Please contact your reseller if you require configuration changes. The following options should be set:
- Enabling iTero import feature (typically, this is enabled by default)
<ScanImport01Enabled>1</ScanImport01Enabled>
- Enabling auto-import by watching directory (this typically needs to be enabled!), and setting appropriate import delay:
<ScanImport01WatchDirImportMode>Default</ScanImport01WatchDirImportMode>
<ScanImport01SleepForMsBeforeImport>2000</ScanImport01SleepForMsBeforeImport>
Please note that without adding these settings, the auto-import will not work.
Troubleshooting: Notification/Auto-Import of new cases temporarily not working
Please ensure that both computers are online and reliably connected to the network, whenever you use the automatic case transfer. In case of network connectivity issues (e.g. when the iTero computer temporarily drops out of the network), the automatic import of cases from iTero will be halted.
- If new cases no longer show up on the CAD/CAM PC automatically, check the network connection, and close and then restart exocad DentalDB/ChairsideDB
- Any cases that may have been 'missed' during or after the network downtime will be auto-imported after starting DentalDB/Chairside DB again.
Understanding & troubleshooting material mappings
On the iTero element, a multitude of materials is available. However, the list of materials on the iTero element may differ from the list of materials available on your CAD/CAM system. A mapping between the materials available on iTero element and the materials available for your production system can be configured by your exocad reseller. For example, "Gold" will typically not be milled directly in a dental lab or practice, but many machines can mill wax, which is then suitable for casting gold. So, a useful configuration option would be to map "gold" to "wax" for CAD/CAM purposes.
- If no material mapping is defined at all for a particular material defined on the iTero, the DentalDB/ChairsideDB software will notify the user about this fact, and will fall back to a default material (typically Zirconia).
- Original material selection (that was done on the iTero) will be added to the Notes field.
- Your exocad reseller controls the material mapping through his exocad configurations. If your configuration has incorrect or missing material mappings, please report these and have them fixed.
- If you run into a message with iTero:Project import paused, check this information for a detailed explanation about how to proceed.
Additional Copyright notice
This page contains screenshots from software copyrighted by Align Technology. Please note that the standard licensing conditions of the exocad Wiki do not apply to these screen shots.


