Introduction
Contents
Prerequisites
In order to use iTero exocad Connector™, you need:
- DentalCAD 3.0 Galway Service Release 1 (Engine Build 7754). Note: If you have an older version (lower Engine Build number displayed in the CAD title bar), please contact your reseller to obtain an upgrade to Build 7754 or later. Please also note that not all resellers ship the software with support for iTero exocad Connector™ enabled.
- Latest version of iTero exocad Connector™ installed. For the download link and installation instructions, please see this page: Updating iTero exocad Connector™
What is the iTero exocad Connector™?
As an exocad user, iTero exocad Connector™ gives you as a dental laboratory an easy and integrated way to directly receive intraoral scan cases from thousands of doctors worldwide, in case the doctor is using iTero “Direct To Lab" workflow. New cases from doctors sending you iTero cases are downloaded automatically and will directly show up in the DentalDB case list.
iTero exocad Connector™ is designed for labs receiving cases from doctors. For setups where the iTero scanner and the exocad software are installed at the same site, and on the same LAN, you have to use the direct integration between iTero scanner and exocad software, which will transfer cases locally, without going through the cloud. The latter workflow is the primary target for dentists and dental clinics (with or without an integrated dental laboratory).
Enabling iTero exocad Connector™
What is the prerequisite?
In order to use iTero exocad Connector™, laboratory and doctor each need a MyiTero account with “Direct To Lab” software option enabled for both the doctor and the lab. In order to obtain one, please visit this page for further information. Please note that MyiTero accounts are separate from Invisalign accounts; being an Invisalign user will not automatically give you access to MyiTero.
In addition, you need exocad DentalDB "Galway" (Engine Build 7662) or later, with an active upgrade contract, or Flex license. Please note that not all exocad resellers have MyiTero support enabled in the exocad configurations that they ship. Please contact your reseller if you have a recent exocad software and don't see the MyiTero-related option in the DentalDB settings dialog, as described below.
How do I set up the iTero exocad Connector™
Starting from exocad DentalCAD Galway (Engine Build 7662), the DentalDB software will - the first start - pop up a window inviting you to set up MyiTero integration.
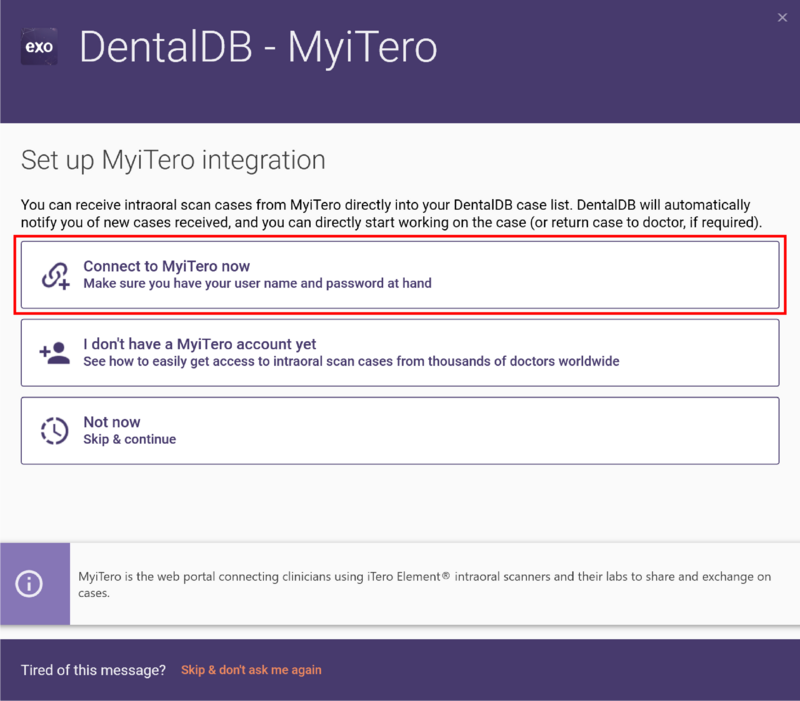
In this window, click "Connect to MyiTero now".
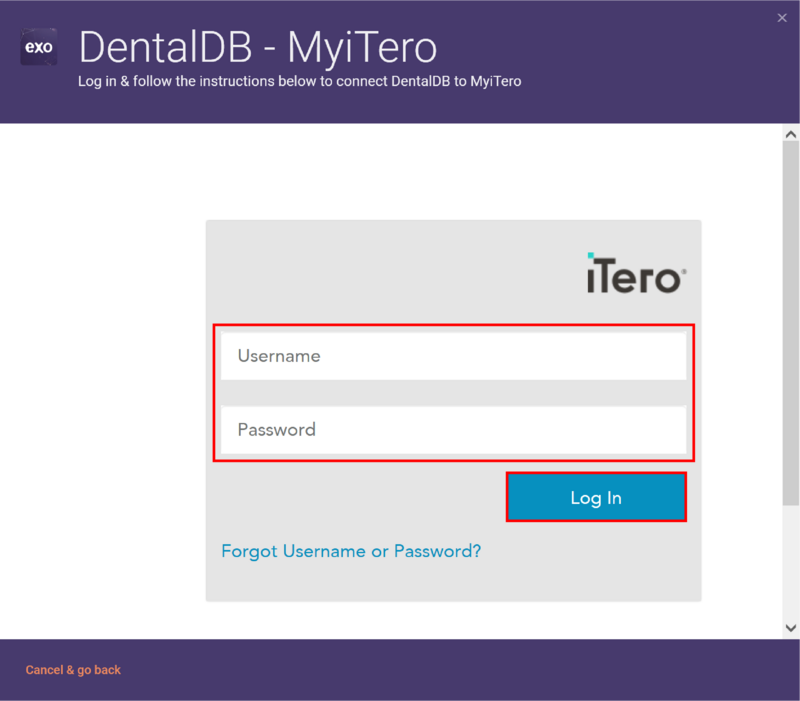
You will now be taken to a login screen, where you can enter your MyiTero credentials:
Click "Log in" when done. That's it! Your exocad installation is now connected to MyiTero, and new cases your lab receives will automatically show up in your case list. Cases that were never opened before are marked as "Unread", so that you can easily discern between new cases received, and your old cases. An icon will show up in the Windows tray if the iTero connector is started. A green dot on the icon indicates that the connection is active and working.
What if the pop-up window doesn't show up on start of DentalDB?
If you have skipped/disabled MyiTero connection, then DentalDB will start without showing the MyiTero connection screen. You can simply re-enable the iTero exocad Connector™ by clicking "Settings" in DentalDB in the iTero connection section and "Enabled" the Import from MyiTero mode.
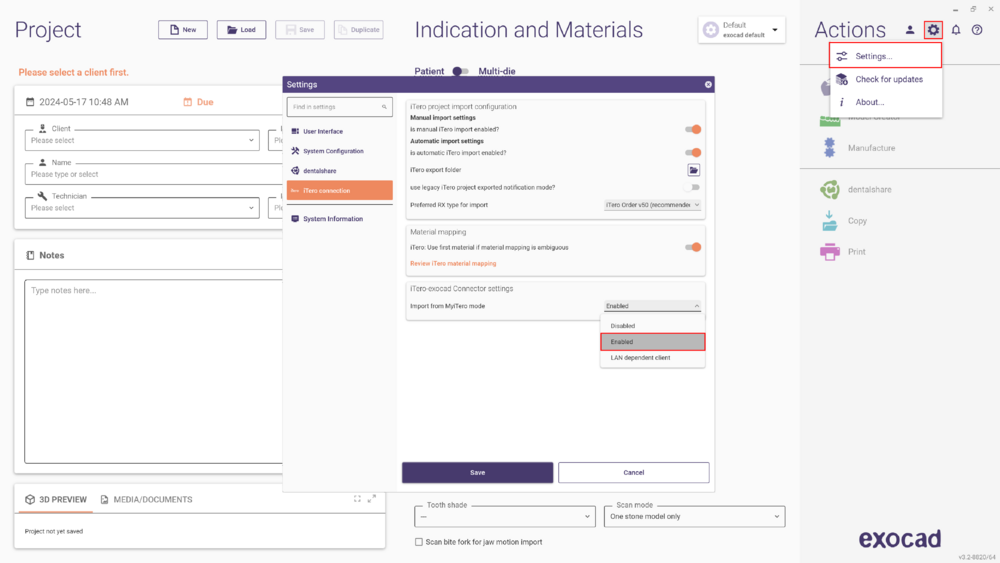 On next start of the software, you will see the MyiTero login screen pictured above, where you can enter your credentials and log in.
Managing doctor (client) mappings
MyiTero maintains a database of doctors, and so does the exocad software. The first time you import a case from a doctor, you will be prompted to map this "iTero doctor" to a "Client" in the exocad software:
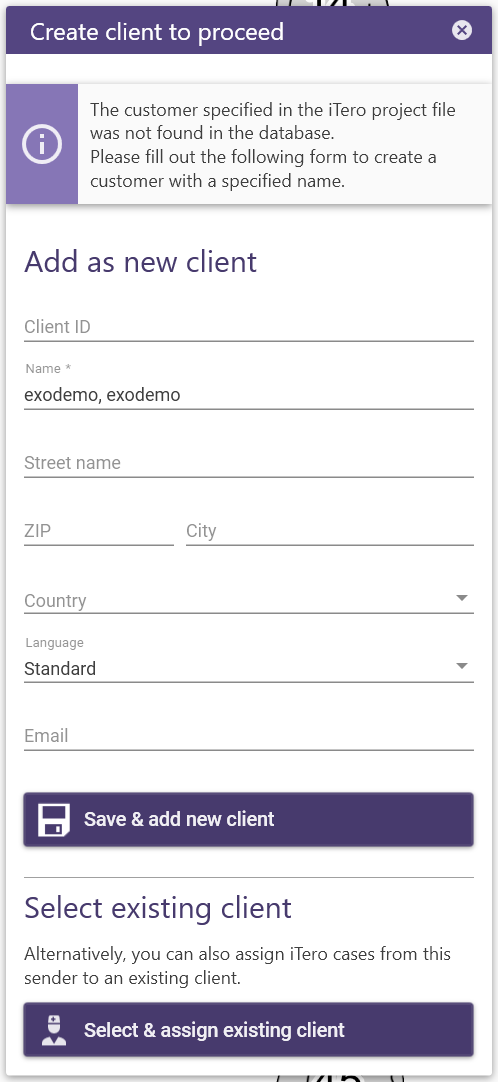 Future cases from this doctor will automatically be assigned to the Client you chose during the initial mapping.
There are two options:
- Assigning a doctor to an existing Client in your DentalDB database: Click "Select & Assign existing client", and chose the correct client in the next screen
- Creating a new Client for the doctor - complete details (if necessary), and click "Save & add new client"
Notes about doctor/client mapping
MyiTero distinguishes between practices and doctors. Consistent with reality, a single practice may have multiple doctors. In the exocad software, such a hierarchy does not exist - there is simply a selection of "Client". When mapping iTero doctors to Clients in the exocad software, please note that the mapping is from doctor (iTero) to Client (exocad) - not from practice to Client. This allows you to save individual defaults for parameters (e.g. cement gap) based on the exact doctor performing the treatment.
iTero:Project import paused: ambiguous material
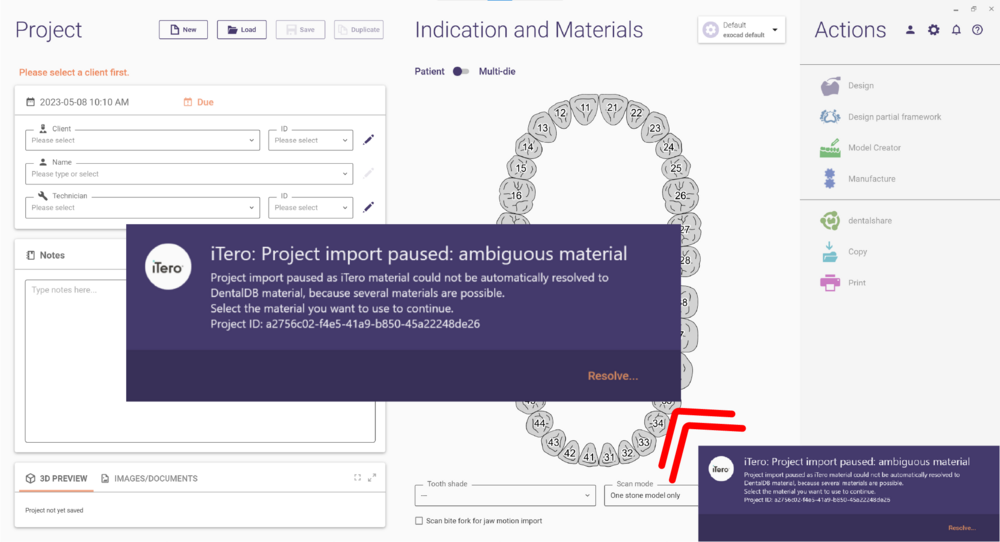 In case this message appears in DentalDB, it means you have to perform the material mapping to proceed. Please follow the steps below.
Managing material mappings
The materials chosen on the iTero scanner are mapped to the material list in your exocad software. To a certain extent, this mapping can be customized.
Why material mappings?
You may wonder: Why is a mapping of materials necessary in the first place? Wouldn't it simply make sense to have the doctor select a material on his scanner, and exactly that material gets selected on your CAD/CAM system? There are two good reasons why a - customizable - material mapping makes sense.
- The doctor may give you some freedom in the choice of material. E.g. the doctor can select "Zirconia: Lab Preference" as material, and the customized material mapping allows you to map this selection to the Zirconia material of your choice.
- The doctor defines the material he ordered, the lab defines the material they produce by CAD/CAM. Why can there be a difference? The best example for this is gold. If the doctor orders a gold crown, labs will not mill it in gold, but in wax. So, it makes sense to allow mapping of "Gold" to "Wax". As an additional example, the same applies to pressed ceramics.
Managing material mapping
When you import a case where the material mapping is ambiguous (e.g. like in the 'Zirconia: Lab Preference' example before, and you have multiple types of Zirconia in your material list), you will be prompted for your preferred choice of materials for this case:
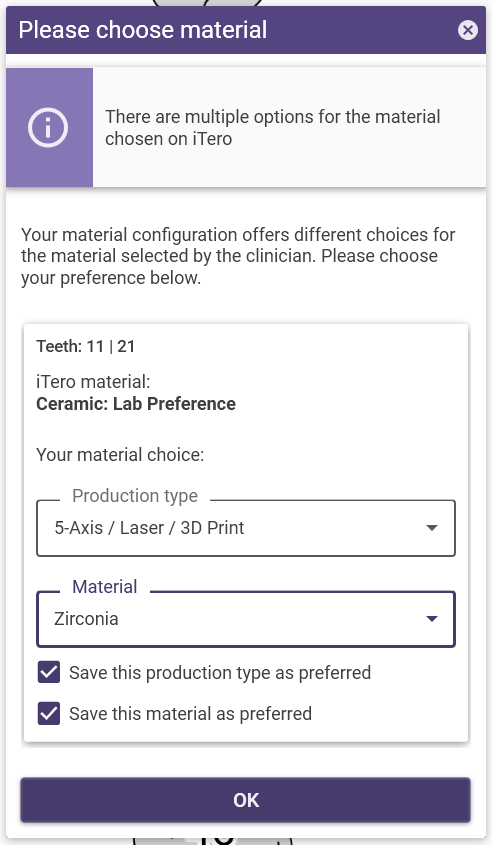 There is also an option (enabled by default) to make this choice the default for future imports of cases with the same material. In addition to the material, you can also chose the production method (e.g. 4-axis milling vs 5-axis milling), and save a default for this as well.
If you've changed your mind, or wish to correct an erroneous material mapping, you can do so by clicking on "Settings" in the main screen, and then on "Review iTero material mapping":
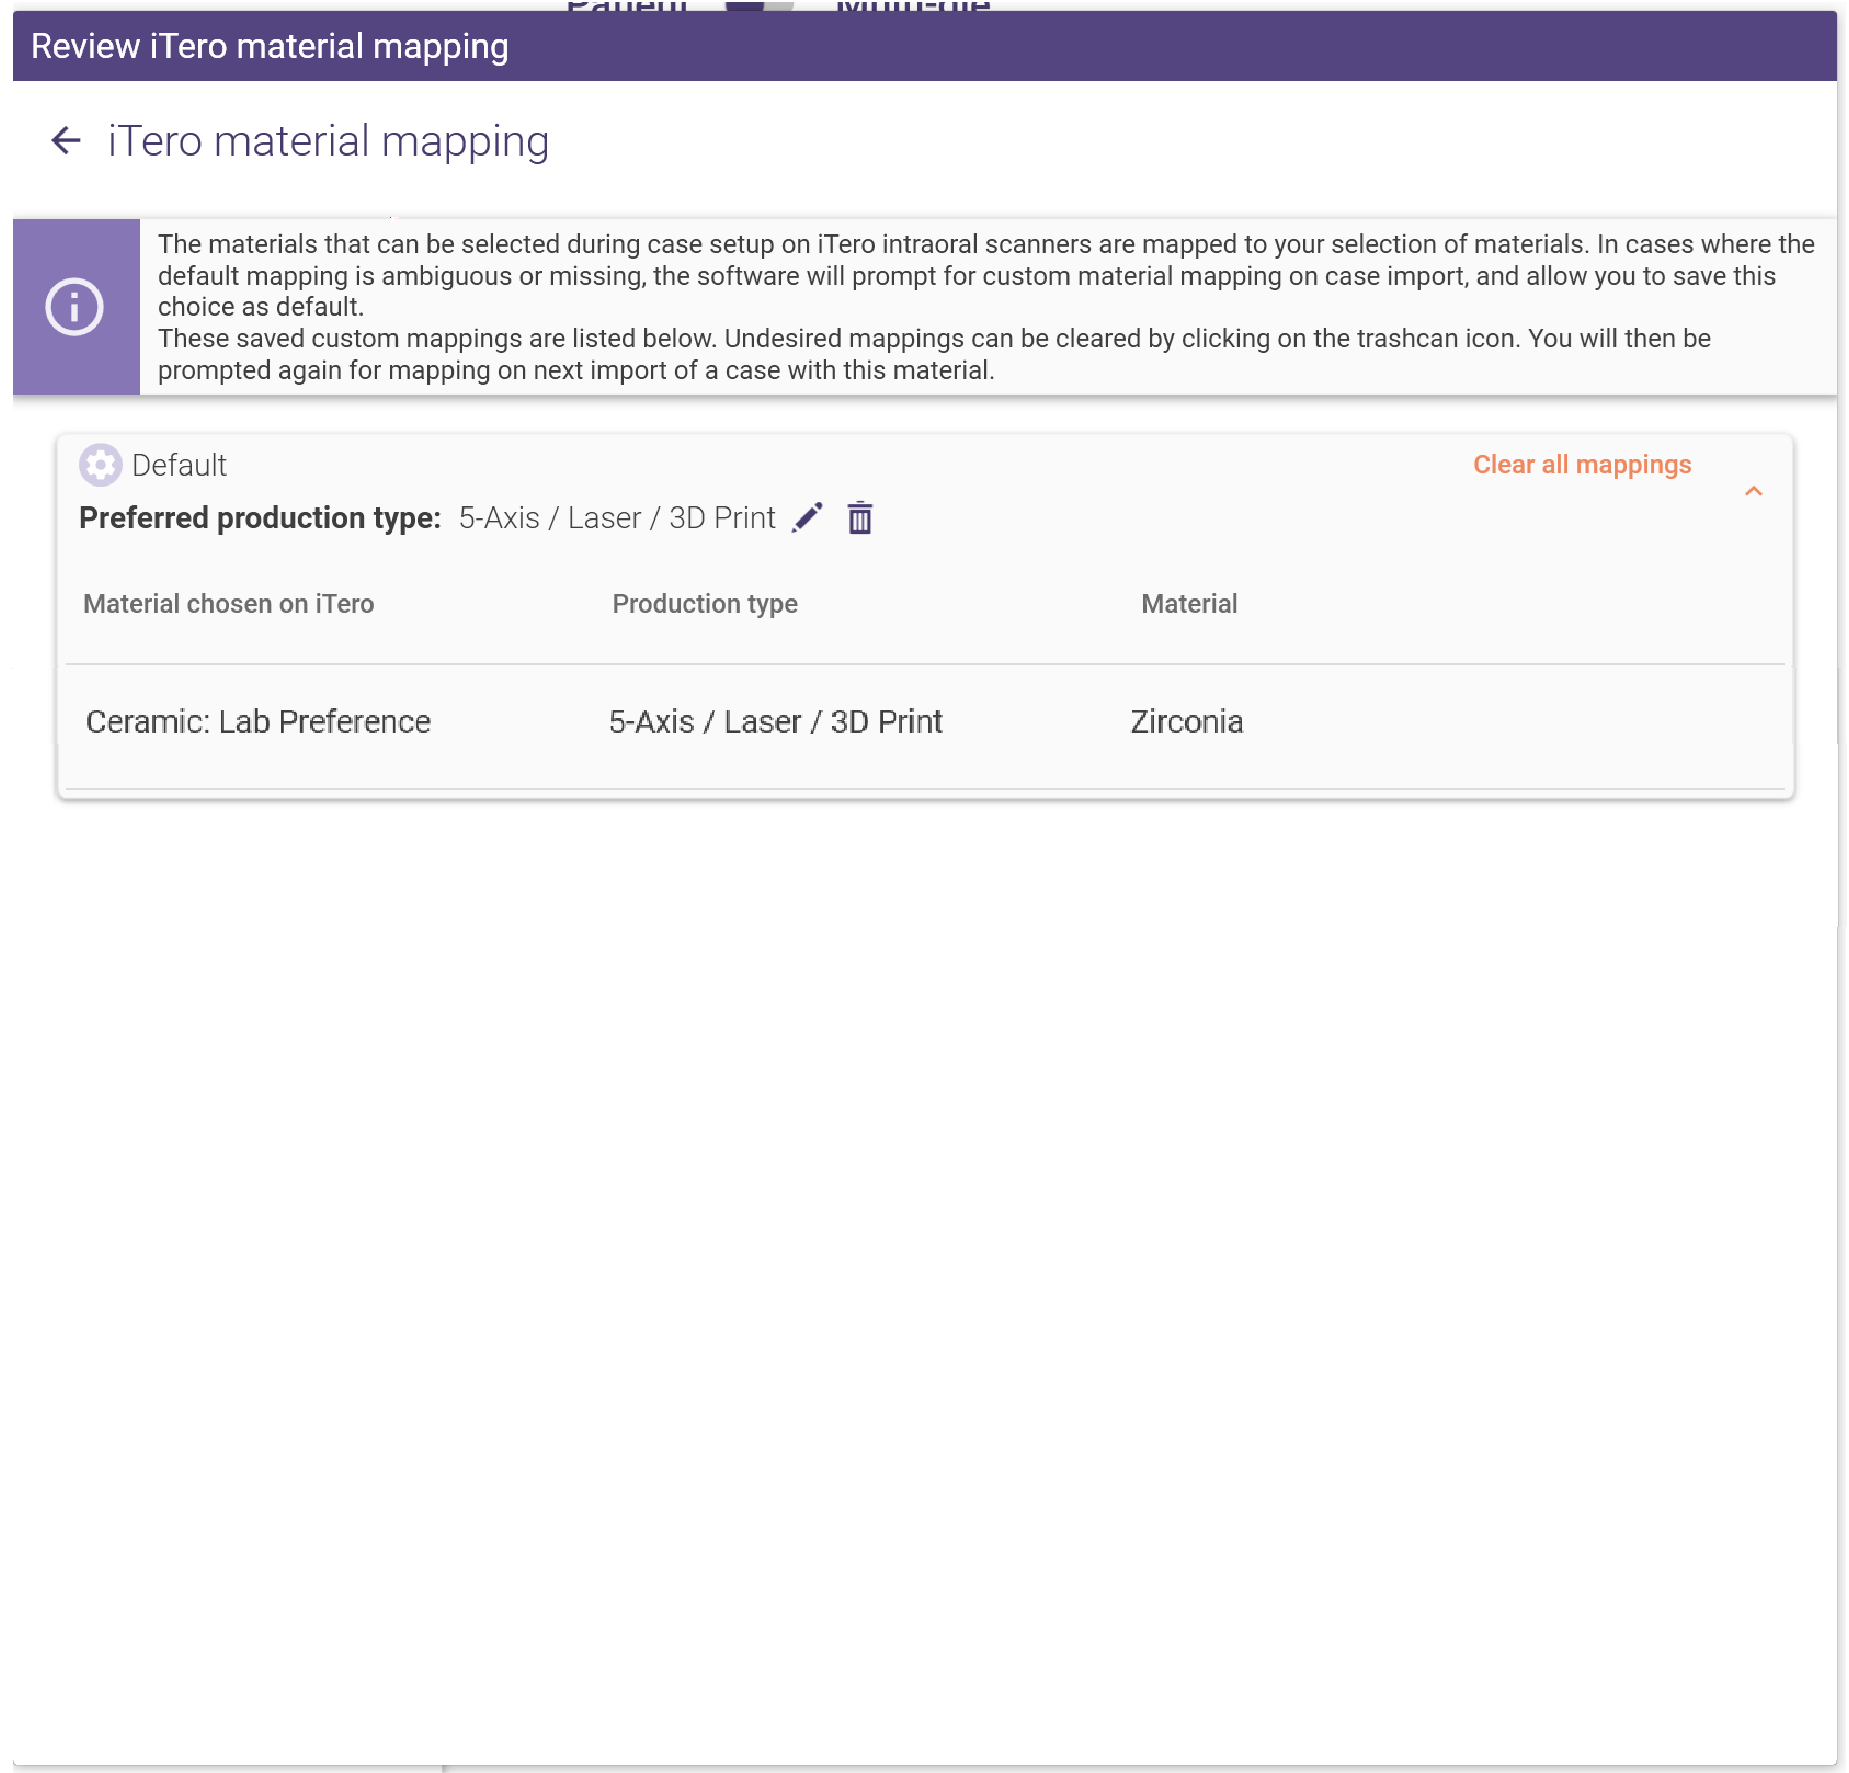
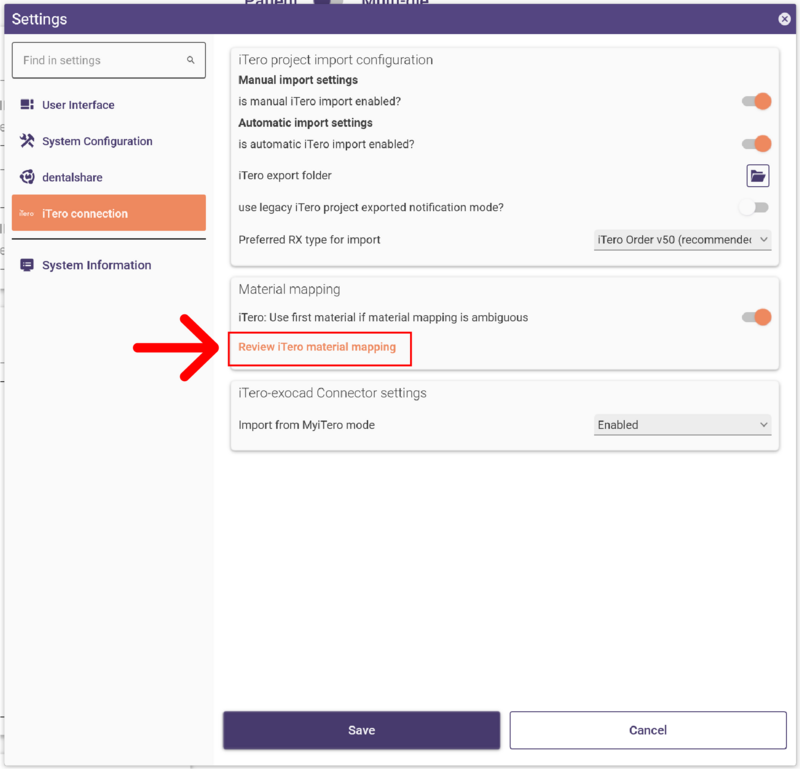 This will open the material mapping window:
Undesired mappings can be deleted - you will be prompted for your preference again the next time you import a case with the respective material choice. Additionally, you have the option to clear the mapping to your preferred production type.
Disabling iTero exocad Connector™
Disabling the MyiTero window on start of DentalDB
If you do not wish to connect your exocad installation to MyiTero, you can simply click "Skip & don't ask me again" in the dialog:
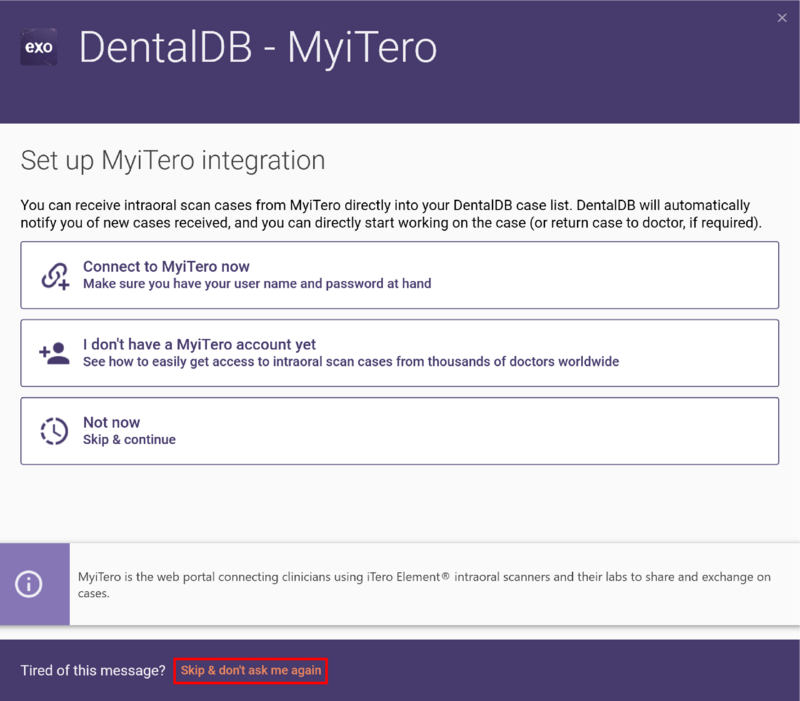 The dialog will not show up again.
Disabling a previously enabled MyiTero integration
If you have already enabled MyiTero integration, and wish to disable it, open the Settings window and under the iTero connection section, set MyiTero integration to "Disabled":
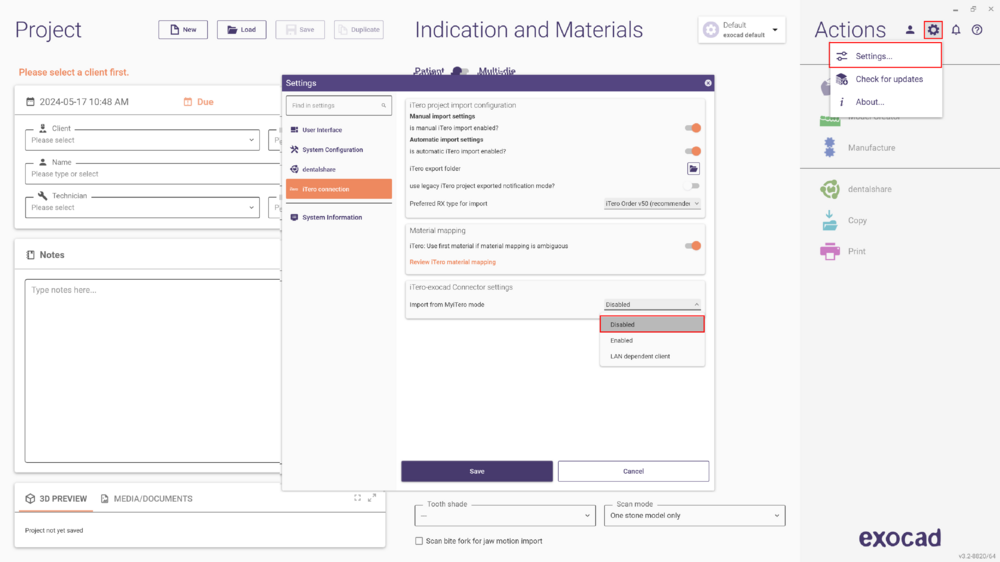 You can re-enable MyiTero integration at any time, as described above.


