Model analysis concept
Correct model analysis is an essential component of any setting up concept. For this reason, it should be completed with great care to the best of knowledge and belief. Model analysis is mostly completed by the operator in CAD. It includes highlighting anatomical characteristics of the upper and lower jaws and their automatic matching to orientation points and planes, which are used as a basis during automatic digital setup of the teeth.
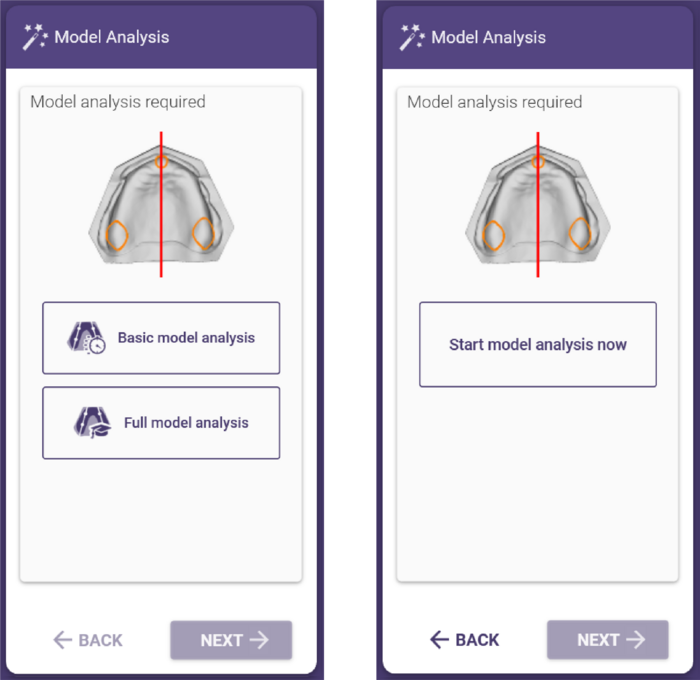
The model analysis wizard
The individual stages of the model analysis are summarized in a wizard window, at the left side of the screen, which comprises two important components. All stages of the model analysis are listed in the bar [1] at the top of the window. It is possible to go back to a previous stage by left-clicking the icon of the required model analysis stage. The second area [2] of the window provides an explanation and preview of the current model analysis stage.
 | Bite rim scan is not needed for single arch dentures, and the model analysis will be carried out on the antagonist. |
|
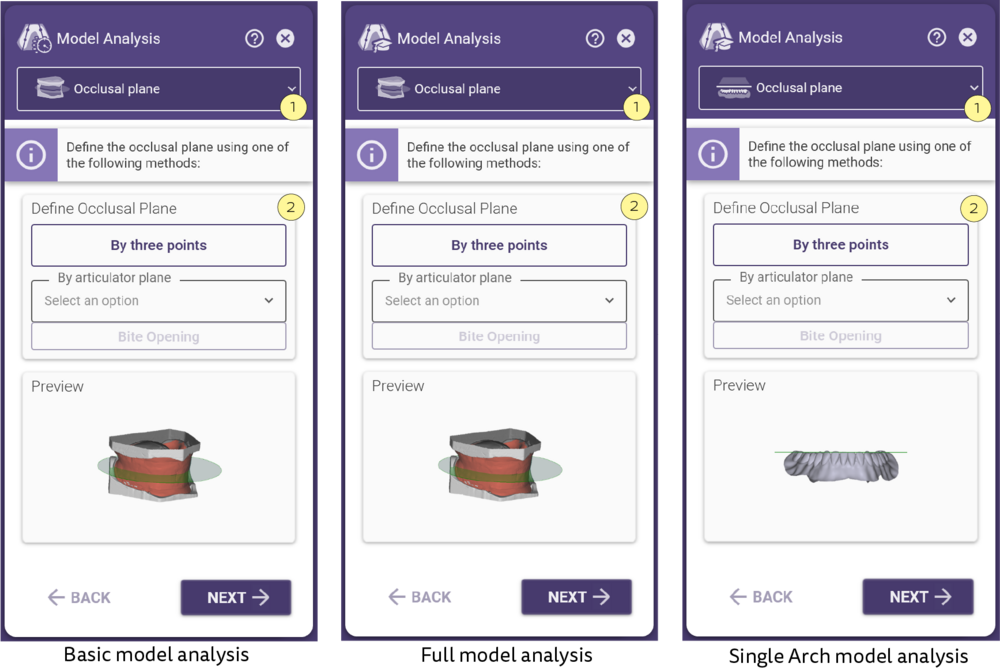
Determination of the occlusal plane
The occlusal plane is used as vertical orientation during setting up of the teeth.
It is defined using three points in a eugnathic dentition:
• Cusp tips of the distobuccal cusps of the lower first molar
• Incisal point of the lower central incisor
There are two possibilities for determining the occlusal plane: the three-point method [3] and the define by articulator plane[4]. Bite opening [5] allows adjustments in the vertical dimension.
|
|
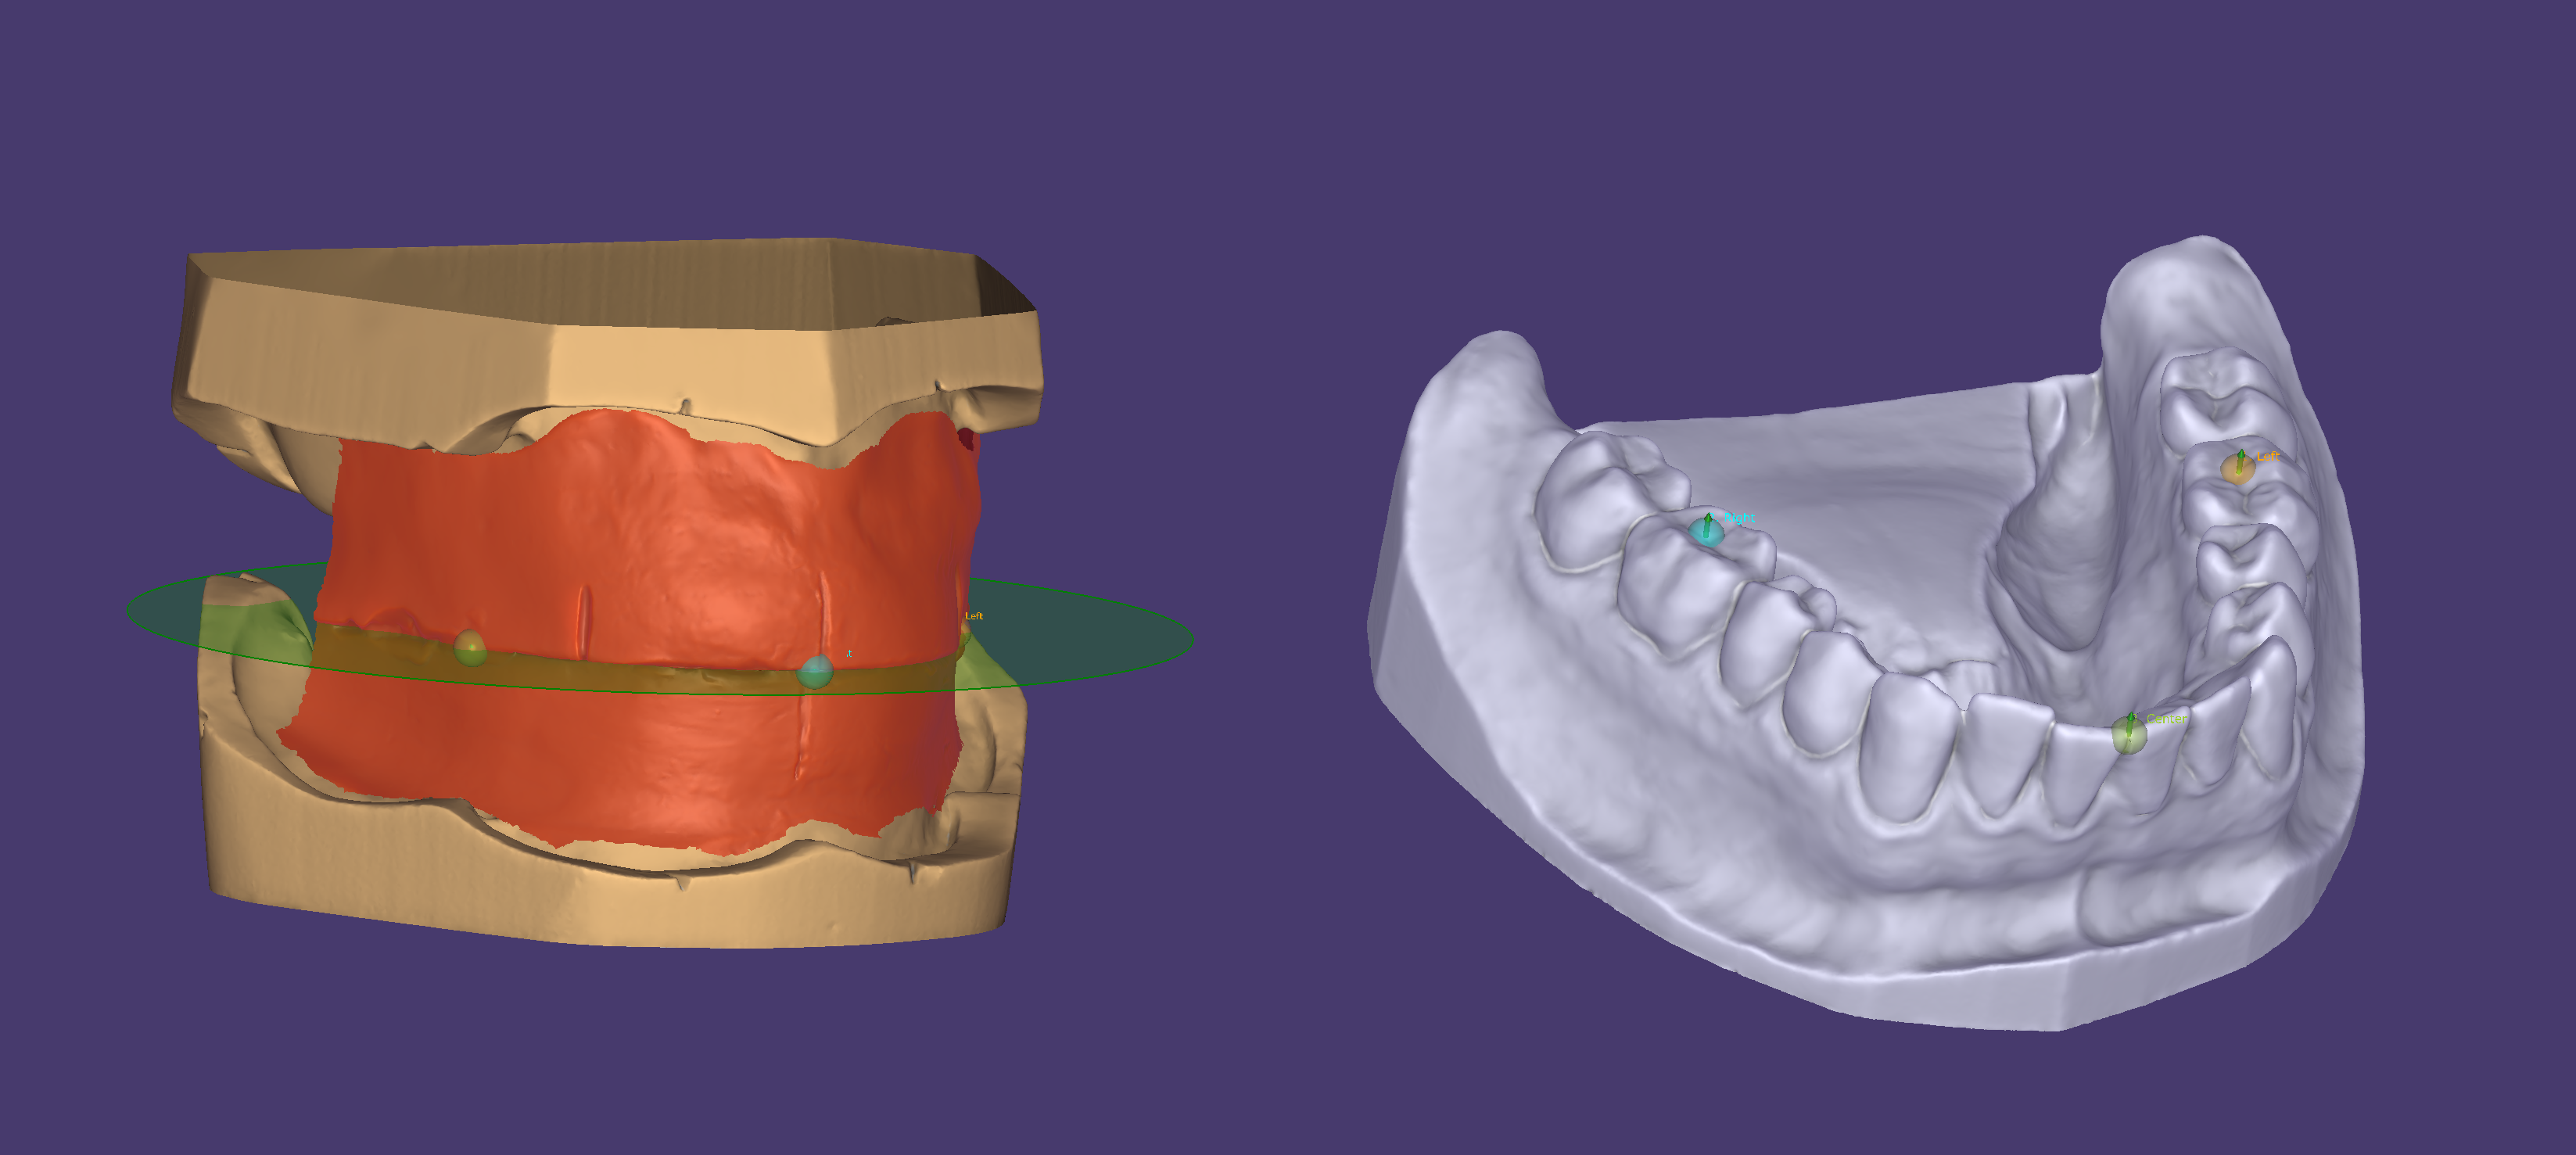
• Three-point method [3]
The function “Define using three points” enables alignment of the occlusal plane using a diagnostic model or an aesthetic template.
• To align the occlusal plane, click three points on the positions described above and then click the “Apply” button.
• To adjust the points (and therefore also the occlusal plane) at a later stage, hold the left mouse button and drag the points as required.
• Alternatively, click to add three points on an edentulous jaw and set the distance of the occlusal plane to the points using the slide control.
• To assign an individual distance to each point, click the padlock symbol to the right of the slide control.
|
|
• Define by articulator plane [4]
If there is no aesthetic template or diagnostic model available, the predefined occlusal plane of the articulator can be used.
Choose one from the dropdown menu to automatically generate and visualize the occlusal plane.
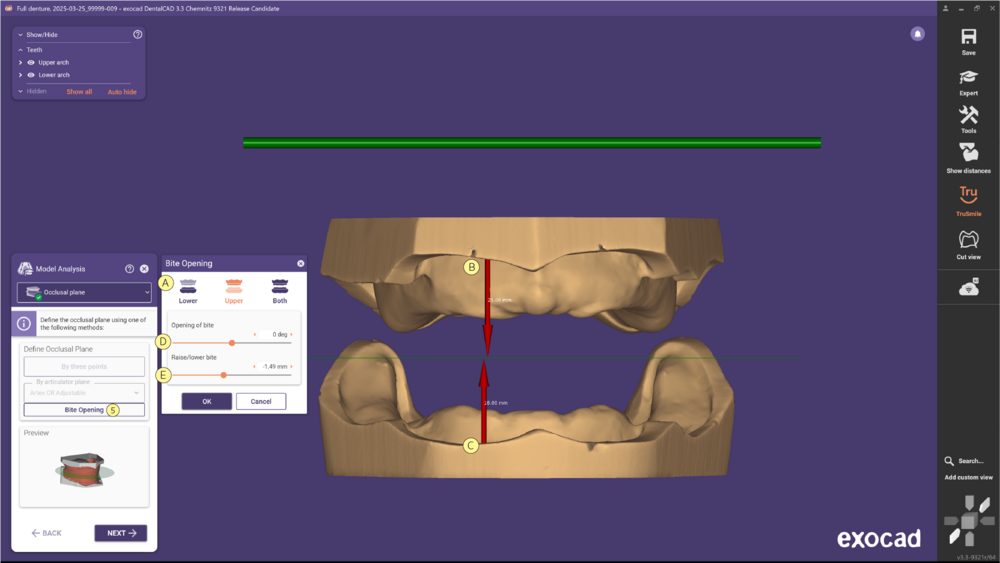
- The Bite opening button opens a dialog where you can adjust the vertical dimension:
- Select which jaw to work on: Lower, Upper, or Both [A]
- Click to mark the depth of the vestibule on the upper [B] and lower [C] jaws. Red arrows will appear, showing the measurement from the marked point to the occlusal plane. Drag the red dot to reposition the marking.
- Use the Opening of bite [D] slider to adjust the jaws in degrees, following the axis of the articulator.
- Use the Raise/lower bite [E] slider to adjust the jaws vertically (in mm) along the Z-axis.
Basic model analysis
|
Marking the incisal papilla in the upper jaw
• Define the incisal papilla by marking a point on its center.
• If required, move points by left clicking and dragging them.
|
|
Marking the maxillary tuberosity in the upper jaw
• Define each maxillary tuberosity by marking points on its center.
• If required, move points by left clicking and dragging them.
|
|
Determination of the median plane in the upper jaw
The maxillary median (line) is automatically generated based on the previously defined incisive papilla and maxillary tuberosity.
To adjust the median plane manually:
• Click the median line and drag to move it.
• Hold CTRL and drag to rotate the median line around its rotation point.
• Click and drag the rotation point to move its position.
|
|
Determination of the position of the maxillary canine teeth
The tips of the first large palatine rugae indicate the approximate position of the canines.
• Click each tip once to create a single point.
• If the correct size of anterior teeth is selected using the nasal width of the patient, enter the measured width in the wizard window. The set of denture teeth recommended later is based on the value entered here.
• If required, move points by left clicking and dragging them.
This positional determination calculates the position for the anterior set of denture teeth and is used as orientation for the initial anterior set-up.
|
|
Determination of the position of the mandibular first premolar tooth
• Left click to mark the positions of the mandibular premolars an extension of the frenula or slightly more distally on the middle of the alveolar ridge.
• If required, move points by left clicking and dragging them.
The positions of the mandibular first premolars are part of the basis for selecting the correct size of posterior tooth and are used for creating the basic statics of the lower jaw, outer and inner lower jaw adjustment.
|
|
Marking the retromolar pad in the lower jaw
• Left click the center of each retromolar pad to mark it.
• If required, move points by left clicking and dragging them.
Marking the retromolar pads forms the basis for defining the basic statics of the lower jaw, outer and inner lower jaw adjustment.
|
|
Determination of the middle of the anterior alveolar ridge contour in the lower jaw
• This point is generated automatically.
• Click and drag the point along the median line of the lower jaw, if required.
The marking of the center of the alveolar ridge is used as a point of reference when positioning the basal surfaces of the anterior teeth.
|
|
Determination of the alveolar ridge midline in the lower jaw
• The alveolar ridge midline in the lower jaw is generated automatically.
• The mesial edge of the retromolar pad is used as the most distal point of the alveolar ridge median line.
• Automatic detection is only an aid and should be checked and adjusted where necessary. This is the only way to ensure the position of the first molar is detected without problems in the next step.
• To change the alveolar midline, click the green fixation points and drag them as desired.
• Delete points by holding the left mouse button and pressing the right mouse button simultaneously.
• Left click to add points to the line.
The alveolar ridge midline is used as orientation of the initial anterior tooth set-up. In addition, the deepest area of the alveolar ridge on this line is determined and given as the position of the first molar. The distal end points of the displayed alveolar ridge midline are used as the limit for the stop line (see Determination of the stop line in the lower jaw) and should, therefore, not be extended onto the retromolar pad.
|
|
Determination of the first molar tooth in the lower jaw
• The positions of the first molars are defined in the lower jaw using these points, which are generated automatically.
• They should be located at the deepest point of the alveolar ridge in relation to the occlusal plane.
• In the case of deep severe extraction wounds in the posterior region, it could happen that these regions are incorrectly determined as the positions of the first molars.
• If required, move points by left clicking and dragging them.
The positions of the mandibular first molars are part of the basis for selection of the correct size of posterior tooth. The first molars should be positioned on the deepest area of the alveolar ridge in relation to the occlusal plane, as the center of mastication is in this area.
|
Full model analysis
|
Marking the incisive papilla in the upper jaw
• Define the incisive papilla by clicking points on the outer margins of the papilla to outline it.
• If required, move points by left clicking and dragging them.
• Delete points by pressing the Delete key while hovering the points with the mouse pointer.
|
|
Marking of the maxillary tuberosity in the upper jaw
• Define the maxillary tuberosity by clicking points on the outer margins of the tuberosity to outline it.
• If required, move points by left clicking and dragging them.
• Delete points by pressing the Delete key while hovering the points with the mouse pointer.
|
|
Determination of the median plane in the upper jaw
• The maxillary median (line) is automatically generated based on the previously defined incisive papilla and maxillary tuberosity.
• To adjust the median plane manually, click the median line and drag it as required.
• Hold CTRL and drag to rotate the median line around its rotation point.
• Click and drag the rotation point to move its position.
|
|
Determination of the labial periphery line in the upper jaw
• The labial periphery line is automatically generated 8 mm in front of the papilla.
• To manually adjust the line, click the labial periphery line and drag it as required.
|
|
Determination of the position of the maxillary canine teeth
• The tips of the first large palatine rugae indicate the approximate position of the canines. Click each tip once to mark it.
• If the correct size of anterior teeth is selected using the nasal width of the patient, enter the measured width in the wizard window at this point. The set of denture teeth recommended later is based on the value entered here.
• If required, move points by left clicking and dragging them.
This positional determination calculates the position for the anterior set of denture teeth and is used as orientation for the initial anterior set-up.
|
|
Determination of the position of the maxillary first premolar tooth
• Define the position of the maxillary premolar by clicking points the width of a premolar behind the previously defined canine position.
• If required, move points by left clicking and dragging them.
|
|
Determination of the pterygomandibular folds in the upper jaw
• Define the position of the pterygomandibular by clicking on them.
• If required, move points by left clicking and dragging them.
|
|
Determination of the frenula in the lower jaw
• Define the position of the left and right frenula clicking points on them.
• If required, move points by left clicking and dragging them.
Often the frenula of the lower jaw are not fully visible; in this scenario, place points at the the assumed positions.
|
|
Determination of the position of the mandibular first premolar tooth
• Click to define the positions of the mandibular premolars are marked as an extension of the frenula or slightly more distally on the middle of the alveolar ridge.
• If required, move points by left clicking and dragging them.
The positions of the mandibular first premolars form the basis for selecting the correct size of posterior tooth and are used for creating the basic statics of the lower jaw, outer and inner lower jaw adjustment.
|
|
Determination of the lingual frenum in the lower jaw
• Click once to define the lingual frenum.
• If required, move points by left clicking and dragging them.
|
|
Marking the retromolar triangle in the lower jaw
• Define the retromolar triangles by clicking points on the outer margins.
• If required, move points by left clicking and dragging them.
• Delete points by pressing the Delete key while hovering the points with the mouse pointer.
Marking the retromolar triangles forms the basis for defining the basic statics of the lower jaw, outer and inner lower jaw adjustment.
|
|
Determination of the median line of the lower jaw
• The median line of the lower jaw is determined automatically.
• To modify the median line, click and drag it as required.
• Hold CTRL and drag to rotate the median line around its rotation point.
• Click and drag the rotation point to move its position.
|
|
|
Determination of the middle of the anterior alveolar ridge contour in the lower jaw
• This point is generated automatically.
• Click and drag the point along the median line of the lower jaw as required.
The marking of the center of the alveolar ridge is used as a point of reference when positioning the basal surfaces of the anterior teeth.
|
|
Determination of the labial periphery line in the lower jaw
• The labial periphery line is calculated automatically and runs through the deepest point of the labial mucobuccal fold.
• To manually adjust the line, click and drag the labial periphery line as desired.
|
|
Determination of the alveolar ridge midline in the lower jaw
• The alveolar ridge midline in the lower jaw is generated automatically.
• The mesial edge of the retromolar triangle is used as the most distal point of the alveolar ridge median line. Automatic detection is only an aid and should be checked and, if necessary, adjusted where necessary. This is the only way to ensure the position of the first molar is detected without any problem in the next step.
• To modify the alveolar midline, click the green fixation points and drag them as desired.
• Delete points by holding the left mouse button and pressing the right mouse button simultaneously.
• Left click to add points to the line.
The alveolar ridge midline is used as orientation of the initial anterior tooth set-up. In addition, the deepest area of the alveolar ridge on this line is determined and given as the position of the first molar. The distal end points of the displayed alveolar ridge midline are used as the limit for the stop line (see Determination of the stop line in the lower jaw) and should, therefore, not be extended onto the retromolar pad.
|
|
Determination of the first molar tooth in the lower jaw
• The positions of the first molars are defined in the lower jaw using these points, which are generated automatically.
• They should be located at the deepest point of the alveolar ridge in relation to the occlusal plane. In the case of deep severe extraction wounds in the posterior region, it could happen that these regions are incorrectly determined as the positions of the first molars.
• If required, move points by left clicking and dragging them.
The positions of the mandibular first molars are part of the basis for selection of the correct size of posterior tooth. The first molars should be positioned on the deepest area of the alveolar ridge in relation to the occlusal plane, as the center of mastication is in this area.
|
|
Determination of the stop line in the lower jaw
• The stop line is generated automatically with an angle of 22.5°, extending from the deepest point of the alveolar ridge line in relation to the occlusal plane and is displayed in the software as points on the alveolar ridge contour.
• If this angle is not exceeded before the end of alveolar ridge marking, the stop line corresponds to the most distal point of the alveolar ridge displayed.
• If required, move points by left clicking and dragging them.
The stop line represents the distal margin of the setting up area and therefore determines whether or not a second molar will be set up. If an angle of 22.5° is not achieved for anatomical reasons (e.g. with a very flat jaw), the teeth should not extend beyond the mesial margin of the retromolar triangle.
|
|
Determination of the alveolar ridge midline and position of the first molar in the upper jaw
• The alveolar midline contour is automatically generated in the upper jaw. The positions of the lower first molars are transferred to the alveolar midline of the upper jaw.
• To change or adjust the alveolar midline contour, click the green fixation points and drag them as desired.
• Delete points by holding the left mouse button and pressing the right mouse button simultaneously.
• Left click to add points to the line.
• It is usually necessary to adjust the automatically detected alveolar ridge contour and therefore also the position of the first molars buccally or labially.
The alveolar ridge midline is used for transferring the position of the first molar of the lower jaw to the upper jaw. The position of the first molar of the upper jaw is a reference point for the outer correction.
|
|
Correction area on the upper jaw
Verify inner and outer correction areas
|
|
Correction area on the lower jaw
Verify inner and outer correction areas
|
|
Automatic calculation of the common basic statics, checking and adjustment
In the final step of model analysis, common basic statics, which is used as a basis for the automatic set-up, is calculated from the points and lines already defined. This is the final step of the model analysis in which all the results are visualized and can be rechecked for correctness.
• Navigate using the wizard bar or the “Back” button to adjust each individual step of the model analysis.
The blue markings indicate the outer adjustment areas and the green markings the inner adjustment areas. The definitive setting up line is visualized as a red line on the model.
|
Single arch model analysis
|
Determination of the position of the first molar tooth on the opposing jaw
• Click to mark the positions of the molars.
• If required, move points by left clicking and dragging them.
|
|
Determination of the position of the first premolar tooth on the opposing jaw
• Click to mark the positions of the premolars.
• If required, move points by left clicking and dragging them.
|
|
Marking the central incisors of the opposing jaw
• Click to define points on the mesial contact of the central incisors on the opposing jaw.
• If required, move points by left clicking and dragging them.
|
|
Determination of the median line of the opposing jaw
• The median line of the opposing jaw is determined automatically.
• Click the median line and drag to move it.
• Hold CTRL and drag to rotate the median line around its rotation point.
Click and drag the rotation point to move its position.
|