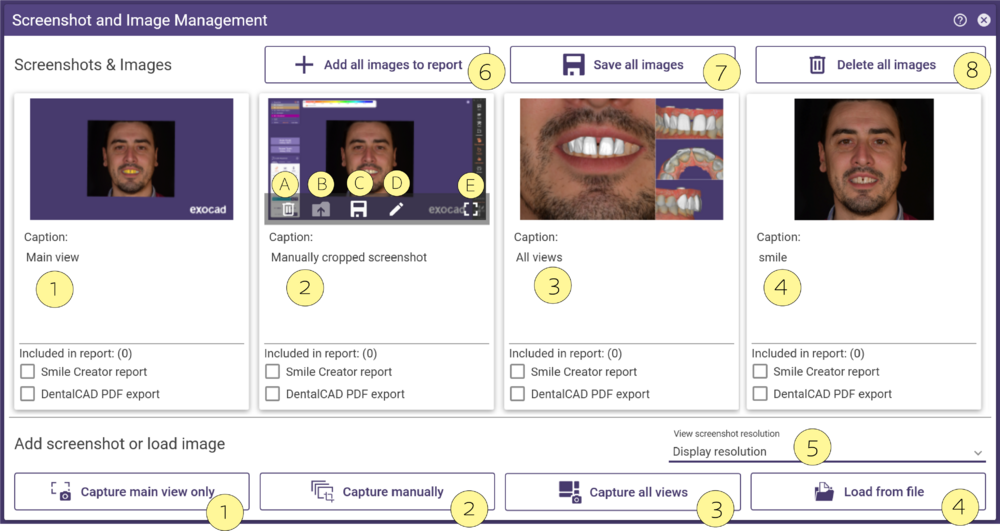
This tool allows you to collect, edit, or tag screenshots and improve communication and documentation. The collected information is automatically saved within the scene and can be saved in the project folder.
Open this tool via Tools->Screenshot and Image Management to edit and save the screenshots directly from DentalCAD.
Capture main view only [1] captures the main view excluding the Main Toolbar, the group selector, and the Wizard window.
Capture manually [2] gives you the possibility to select manually an area to crop and includes all the elements of the screen (main toolbar, Wizard), or just a small portion of the screen.
Capture all views [3] captures all views, main view, and side views. Only active if multiple views are available e.g. during the Connectors multi-view design, Smile Creator Modelling step and opening the Smile window.
Load from file [4] – Load external images into the project folder.
Using the mouse over the image you will see additional options. You can delete the image [A], open the container folder [B], save it [C], edit the image [D], or visualize it in Fullscreen [E].
| The option [D], allows you to edit the image using editing software (Paint) or to set any other editing software as default in Settings. |
Use the Add all images to report [6] to include all the images in the PDF report, additionally, Save all images [7] in the folder or Delete all images [8] . The images will be stored in the project folder.
Please note that when you are capturing the main view only or all views, you can choose in the dropdown menu View screenshot resolution [5] and select from Display resolution, 2x, 3x or 4x. Selecting 2x, it will double the screenshot resolution, 3x, triple it and 4x, quadruple it. In case the ‘’Main view’’ is used, the taskbar and the Main Toolbar will be removed from the full screenshot and the resolution will change accordingly, removing this space.
| To save a screenshot in the project folder use CTRL + SHIFT + Q |


