Copy/Mirror Tooth


You can use the "Copy"/"Mirror" feature to mirror existing teeth that you would like to replicate.
Contents
Copying/Mirroring Existing Teeth
This Wizard step appears if the project has been defined appropriately. If you design a restoration for a molar and an incisal tooth is marked as adjacent/healthy, it does not appear.

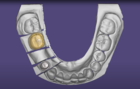
Use Copy [2] to copy teeth within a quadrant. Use Mirror [3] to copy teeth cross-arch (between quadrants). Any restored tooth location which does not receive a copied tooth anatomy will use a model tooth instead.
Copying/Mirroring Teeth with Direct Copy Target
Step 1: Select Copy/Mirror.
Step 2: In the scan, click the tooth you want to copy/mirror. DentalCAD automatically extracts the scanned tooth geometry and displays it in yellow.
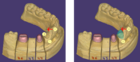
Step 3: Move the cursor to the target location and confirm the target position with a second click. To move a copied/mirrored tooth, drag it with your mouse. To rotate, hold CTRL and drag. To scale, hold SHIFT and drag.

By clicking Undo after your first click, you return to selecting the anatomy to be copied.
Click Mirror/Copy another to copy more teeth. If you have only one restoration, there is a button Change copy of tooth instead, which allows you to select the tooth to copy again.
If the tooth number that will receive the mirrored/copied tooth is unclear, a tooth selection window will appear where you can select the tooth which will receive the copy.
Copying/Mirroring Teeth with Virtual Pre-op Target
To create a virtual pre-op scan from copied anatomies:
Step 1: Select Copy or Mirror.
Step 2: Click a scanned tooth. Add tooth geometries (fix in their relative positions) by holding CTRL while clicking additional scanned teeth.
Step 3: Drag the tooth/teeth to the desired position, and click again to place the tooth copies. To move a copied/mirrored tooth, drag it with your mouse. To rotate, hold CTRL and drag. To scale, hold SHIFT and drag.

If your project includes multi-tooth gaps, a tooth bow window prompts you to confirm/select the tooth numbers which will receive the copied anatomy. Click OK in the tooth bow window to confirm the tooth selection.
“Correct” Tab
In the Correct tab, you can edit the extracted geometry used for copying/mirroring with a brush tool.

Mark areas on the scan by holding the left mouse button and dragging. Hold SHIFT to invert the brush functionality. Use the Brush size slider [1] to define the brush tool size. Click Clear surface selection [2] to clear your corrections. Click Apply [3] to apply your changes.
Extract Tooth
To extract a tooth following the Wizard steps, you have to select on DentalDB the option Virtual extraction as shown in the image below. Another option would be to use the expert mode.


This option allows you to just extract the tooth No Copy [1] or extract the tooth and keep it as a pre-op with Virtual pre-op [2].
Adjust the amount of gingival recession using the slider Collapse gingiva [3].
The recession axis can be changed using the arrow and enabling the button [4].
To discard all changes click Discard changes [5].

Pre-op workflow

- If in DentalDB you select as Additional Scan a Pre-op model and say yes to Copy or mirror scanned anatomy as shown below, the anatomy will be copied automatically without the need for extra steps.


- To proceed with the existing anatomy, click Yes, continue with copied tooth [1].
- Otherwise, if you would like to load a tooth from the library click No, use tooth from library [2].
- In this window you can also choose to Correct the selected area [3] or Manually copy/mirror [4] .