Matching the scan abutments


Detect implant position
 Entering the Detect Implant Position, the tooth 16 is automatically pre-selected in the left panel. The software will prompt you to choose one option. Use the Search bar [2] at the top to find a library by article number, manufacturer name, component type, or other related criteria.
Click Favorites [3] ⭐ to quickly access your most-used component libraries. You can mark or unmark libraries as favorites by clicking the star on each library tile. Click the Filter [4] button to open the filtering options.
- Set parameters to refine your search [5]:
- Component Type: Titanium base, Direct-to-implant, Stock abutment and Premilled blank
- Connection Type: Any, Free, Engaging and Locked.
- Screw Channel Angulation: Any, Straight, Fixed angulation and Variable angulation.
- Click outside the filter menu to apply the changes.
- In the Suppliers section [6], choose the appropriate manufacturer and the list of component systems will update accordingly.
 Click to choose the type of implant and select an implant from the CAD library. The implant connection type [7] is then defined. The family button [8] is used to select between library families.
[9] gives information about the chosen implant library. You can rotate the library in the preview dialog by right-clicking it and then holding and dragging the mouse.
Click to choose the type of implant and select an implant from the CAD library. The implant connection type [7] is then defined. The family button [8] is used to select between library families.
[9] gives information about the chosen implant library. You can rotate the library in the preview dialog by right-clicking it and then holding and dragging the mouse.

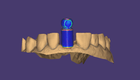
Look at the red point [10] on the scan abutment in the wizard window. Click the same position on the scan data. (Note: You can rotate the scan abutment in the 'Detect Implant Position' dialog by right-clicking it, and then holding and dragging the mouse).
If the scan data is not ideal and artifacts are in the lower part of the scan abutments (i.e. if the adjacent teeth are too close to the scan abutments), it may help to cut away the lower part of the geometry from the scan abutment for matching by increasing the slider [11]. This may help improve results.
| You can measure the accuracy by pressing the <CTRL> [12] – if you see a lot of blue color with a mixed green/gold pattern on the top, it's good. |
Clicking Next [13] move to the next implant selection or when you are finished to the next step.
| Press Tab to move to the next implant, or Shift + Tab to return to the previous one. |
| For information about downloading additional libraries, refer to Library Manager. |