Correct Tooth Placement


Contents
Video Tutorials

Tooth Placement
In this step, you can position model teeth precisely.
 Simple tab Simple tab
|
 Advanced tab Advanced tab
|
 Chain tab Chain tab
|
In the Tooth Placement window, three tabs are available: Simple, Advanced, and Chain Mode. They represent three modes for performing tooth placement. The Chain Mode tab is only activated if you position multiple teeth.
Simple Mode

Moving Tooth Models
1. Activate Move.
2.Click the model tooth you want to move.
3. Drag the tooth to the desired position.
To restrict movement to certain directions, activate a corresponding radio button.
| SHORTCUTS |

Rotating Tooth Models
1. Activate Rotate or use the shortcut in Move mode.
2.Click the model tooth you want to rotate.
3. Hold the mouse button and drag. The rotation center is the model tooth’s center.
To restrict rotation to certain directions, activate a corresponding radio button.

Scaling Tooth Models
1. Activate Scale or use the shortcut in Move mode.
2. Click the model tooth you want to scale.
3. Hold the mouse button and drag the mouse to scale the tooth. A green arrow indicates the scaling direction. To perform direction-based scaling, hold CTRL and SHIFT.
To restrict scaling to certain directions, activate a corresponding radio button.

If you want to move all the teeth, check the box "Move all simultaneously".
Activating the Move all simultaneously you can use the CTRL + right click to deselect teeth
 |
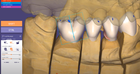
Tooth library switch

Using the library drop-down [1], you can change the tooth library. Click the arrow buttons [2] to select the next/previous library in the list. Hold CTRL while scrolling the mouse wheel to cycle between all installed. The dropdown menu [1] will open a preview of the available tooth libraries as you can see below.

Advanced Mode
In the Advanced tab, you can perform instant anatomic morphing on the model teeth. Hold SHIFT to scale different tooth parts. Hold CTRL to rotate different parts. Hold CTRL + SHIFT to translate different parts.

- Tooth axis selection scaling [1] allows intuitive direction based scaling. Whilst holding down SHIFT, left-click to point and move towards the axis of a tooth that you want to scale. With CTRL + SHIFT you can scale two axes of the tooth simultaneously.
- Free axis selection scaling [2] adds a visualization boundary which makes it easier to see the direction of the scaling. Hold SHIFT to scale in one direction. Hold CTRL + SHIFT to scale in two directions.
- Region of interest Free forming [3] allows you to make basic shape changes during the tooth setup stage (e.g. moving a cusp).
- Free-forming of tooth parts [4] allows you to make changes on tooth parts, use SHIFT to scale parts uniformly and CTRL to rotate parts.
- Anterior symmetry [5] to keep the front teeth symmetrical on both sides of the jaw according to the selected symmetry plane.
- 1-to-1 Mirroring [6]keep the exact tooth shape mirrored on both sides of the selected jaw.
- Instant anatomic morphing cutting with antagonist [7]: If you click and move/scale a tooth, the intersections with the antagonist will be cut.
- Instant anatomic morphing deformation with antagonist [8]: If you click and move/scale a tooth, DentalCAD will automatically adapt the tooth shape to the antagonist and create adequate contact areas.
- You can maintain the minimum thickness by selecting the corresponding button [9]. When moving a tooth, it will be modified in a way that minimum thickness is applied in real time. Maintaining the minimum thickness works in combination with different morphing tools
- Select Anterior or Posterior and using the slider [10], you can apply natural tooth abrasion. Flatten the cusps or create a deeper shape for the posteriors as well as reshaping the anterior.
Chain Mode
The chain mode is a useful function to arrange model teeth in multi-tooth bridges. It is not available if you have copied teeth as direct copies in the tooth anatomy generation step or if reduced pontics are present in your project.

The tube [1] indicates the tooth chain. Placement discs [2] mark the ends of the tooth chain.
By clicking the control points [3], which are present for every model tooth and the placement discs, you can pin positions of
teeth and placement discs. When pinned, the control point appears in red and the tooth / placement disc will not be affected
by movement/rotation/scaling actions. Clicking a red control point will unpin the tooth / placement disc again.

There are three chain modes, represented by the three top buttons in the Chain Modetab:
- Chain: transforms all teeth in a chain
- Single: transforms a single tooth
- Tube: transforms all teeth on a fixed bow
Move, scale and rotate model teeth in a chain using the same functions as in the Simple tab when in Move mode.
- To move the tooth chain, click a model tooth in the chain and drag.
- To rotate the tooth chain, click a model tooth in the chain where you want to apply rotation. Drag in the desired rotation direction while holding CTRL. The greater the distance to the point you selected, the lesser the rotation influence.
- To scale the tooth chain, click a model tooth in the chain and drag in the desired scaling direction while holding SHIFT.
You can also move, rotate and scale placement discs. When clicking a placement disc, the control points of both discs turn
red and you can drag one end of the chain while the other end remains fix. Once you let the disc off, both placement discs
will be unpinned (green) again.
The following checkboxes are available in chain mode:
| Function | Description |
| Teeth Scalable | If a chain transformation is too big, the teeth will be scaled. Uncheck to deactivate. |
| Keep in Contact | By default, the teeth remain in contact. Uncheck to deactivate. This will allow gaps and intersections between teeth. When activated again, contacts will be re-established. |
| Show Chain Controls | Uncheck to hide the tube and the control points. |
| Instant Anatomic Morphing | If enabled, the set used in the Advanced tab will be applied with the release of the mouse button. |
| Undo/Redo | Revert/repeat changes while in chain mode placement. Note that the undo/redo history gets lost when leaving the Chain tab. |
Single Mode
To move, rotate, and scale an individual tooth, use the same functions as in the Simple tab when in Move mode:
| SHORTCUTS |
Tube Mode
In this mode, you can move, scale, and rotate teeth in a chain along with a fixed bow, indicated by a red tube extending the ends of the main tube.

Move the teeth along this bow by dragging your mouse. Rotation and scaling behavior are the same as in Chain mode. The checkbox Keep in contact is not available, as the teeth always stay in contact. Available checkboxes are Teeth Scalable,Show Chain Controls and Limit Rotation to Buccal/Lingual Tilt, with the same functions as in Chain and Single mode.
Symmetry Option

In the Options section of the Chain Mode tab, the Symmetry button is activated if you place model teeth on both jaw sides at opposing positions. You can use the symmetry function to create symmetry for the right and left jaw sides.
The Symmetry button actually consists of four buttons. Hovering over one of these buttons displays blue symmetry indicators in the main view, indicating the symmetry plane, considered teeth (blue control points), and the symmetry direction.


Define a symmetry by clicking one of the four buttons. The entire Symmetry button will appear activated. Any movement/rotation/scaling action on one jaw side will be mirrored to the other side along the symmetry plane. To deactivate the symmetry function,click Symmetry again.
Note: Front teeth symmetry includes canines and premolars, not only incisors. The symmetry plane control is a sphere with two arrows. The arrows indicate which teeth are used as reference for the plane orientation. The reference teeth are locked (red control points).

To change the reference teeth, click the control point of a tooth on either jaw side. The symmetry plane control will jump to the new position and the control points of both reference teeth will appear red. To pin the symmetry plane, click the sphere between the arrows.
Reset Options
Clicking Reset in the Options section of the Chain Mode tab displays available reset options you can select
from.

| Function | Description |
| Reset (keep red) | Restores the original position of unpinned teeth (green control points), but keeps the current position of pinned teeth (red control points). |
| Reset all | Keeps changes made in the Simple tab, discards all other changes. |
| Global Reset | Restores the original position of all teeth, discards all changes. |
| Cancel | Keeps all current tooth positions. |
Choosing a Different Tooth Model
To replace a tooth model with a different model (e.g. to put a premolar-shaped tooth on a molar preparation, due to space restrictions), right-click the tooth to replace and choose Choose Library Tooth - you can now select a different tooth model.