Model Creator Module


Contents
- 1 Overview
- 2 Model Alignment
- 3 Model types
- 4 Default
- 5 Quick
- 6 With predefined base
- 7 Digital waxup model
- 8 Quick with iTero Articulator
- 9 Quick with xSNAP Articulator (purchase required)
- 10 Amann Girrbach Artex Print & Click - Detailed mode
- 11 Amann Girrbach Artex Print & Click - Easy/Quick
- 12 Baumann - Modellsystem 2000 EVO plate
- 13 Dreve - Solid (gingiva mask flat)
- 14 Formlabs 3B
- 15 Formlabs 4B
- 16 Inhio B.B.R. srl. - BasePin PBSM02 plate
- 17 Ivoclar preset with cutout dies
- 18 Kois Center - Model Alignment
- 19 Demo configuration
- 20 Red Dental - Dental Pin ART evolution plate
- 21 Zfx - Digital-intraModel System plate
Overview
The Model Creator module allows the fabrication of digital models either by subtractive or additive methods. The models can be fabricated with any scannable material such as gypsum or die stone and can be sectioned or not. The model must be scanned with an open (STL format) or integrated scanner. These models can be made traditionally by having removable dies within the model, or on a prefabricated pinned base. This module also has the option of preparing for articulation using stabilization/occlusion rods and or posterior slot-style receptacles for various articulation systems.
Model Alignment
To begin, the DentalDB (database) must be filled out properly. See "Getting Started". Once done, the Model Creator button is pressed and the application is launched, and the model fabrication process is started.
The Wizard will start with the Model Alignment step. Here there are many options:
|

|
| To move the models, left-click on the models and drag, and to rotate the model hold the CTRL button and left-click on the mouse. |
Model types
| For implant models with lab analogs, select any of the following model types except Digital Wax-Up, as this option generates a digital wax-up only. |
Default

Quick

With predefined base

Digital waxup model

| If you would like to learn more about Digital Wax up models, please visit the dedicated Mockup model page. |
Quick with iTero Articulator

Quick with xSNAP Articulator (purchase required)

Amann Girrbach Artex Print & Click - Detailed mode

Amann Girrbach Artex Print & Click - Easy/Quick

Baumann - Modellsystem 2000 EVO plate

Dreve - Solid (gingiva mask flat)

Formlabs 3B

Formlabs 4B

Inhio B.B.R. srl. - BasePin PBSM02 plate

Ivoclar preset with cutout dies

Kois Center - Model Alignment

Demo configuration

Red Dental - Dental Pin ART evolution plate

Zfx - Digital-intraModel System plate

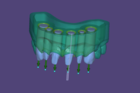
For plate-type models, the plate(s) will be visualized:


| Areas marked in red will be removed |
If you choose model with plate, the next step will be:
For plateless models, the upper and lower boundaries (which of course depend on your height setting) will be visualized:

| Remember that areas marked in red will be removed |
If you choose the Default model type, the next step is: