This step appears if your project contains reduced restorations, and allows you to define regions for applying veneering material. You can also use anatomic reduction to design occlusal stops, lingual bands, mamelon and facial cutbacks, and thimble (retrievable) crowns.
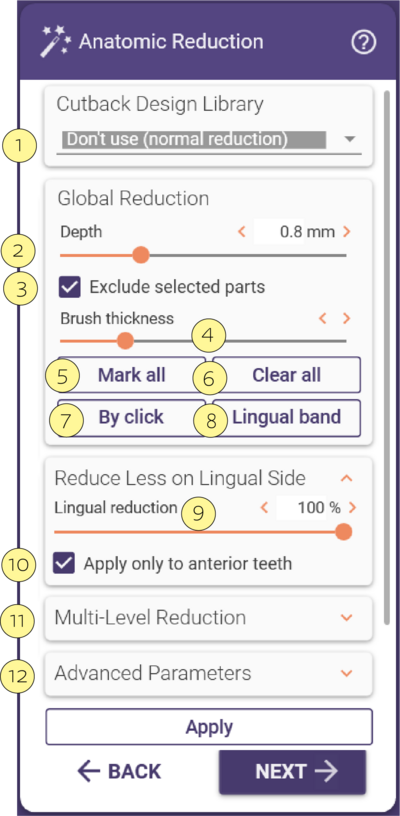
- Cutback Design Library [1] controls special cutback modes (e.g., facial cutbacks, incisal cutbacks). This chapter describes regular reduction without cutback design library.
- The slider Depth [2] controls the reduction amount – that is, the thickness of the veneering layer you want to apply over the framework. The minimum thickness specified for the material will be enforced, which means that in areas where the material thickness does not allow it, the cutback will be less than what you set with the slider.
- By default, the entire anatomy is reduced uniformly. Check Exclude selected parts [3] to perform partial reduction, and to mark areas with a brush tool. These areas will keep the full anatomic shape. This technique is useful for creating lingual bands, occlusal stops, or if there is not enough space for ceramic on the occlusal surface. Define the brush thickness using the corresponding slider [4]. Hold the left mouse button and drag to paint areas. To unmark regions, hold SHIFT. You can mark the whole anatomy by clicking Mark all [5] and clear all markings by clicking Clear all [6 ]. You can mark individual teeth by selecting By click [7].
- If you want to apply less reduction on the lingual side, set the slider Lingual reduction [9] below 100%. For example, if you have set a reduction depth of 1 mm, and set lingual reduction to 60%, the reduction will be just 0.6 mm on the lingual side. By default, this lowered value is only applied to anterior teeth. To apply it to all teeth, uncheck Apply only to anterior teeth [10].
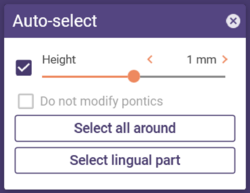
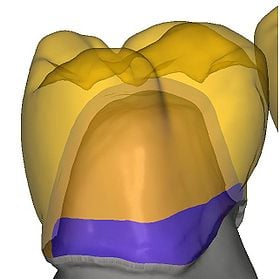
- Click Lingual band [8] to mark a collar region for creating a lingual band. This opens a new window:
- Define the collar’s height (measured from the margin line) using the slider Height.
- If pontics should remain untouched, check Do not modify pontics.
- Click Select all around to mark a 360 degree collar.
- Click Select lingual part to mark a lingual collar.
- Define the collar’s height (measured from the margin line) using the slider Height.
You may exclude certain parts from the shrinking, which will then be kept in full anatomic shape. This is useful e.g. for creating lingual bands, or for designing a metal chewing surface if you don't have enough space for ceramic on the occlusal side. Check Exclude selected parts [3] – observe how the teeth then turn yellow, they are now responsive to mouse actions. "Paint" areas on the teeth using the left mouse button. These areas will be excluded from the reduction.
| Hold <SHIFT> to erase |
- Multi-Level Reduction [11] allows multiple reductions of a tooth anatomy, for more sophisticated veneering. Check Exclude selected parts [3], adjust the incremental reduction depth [2] , and click Apply as many times as needed.
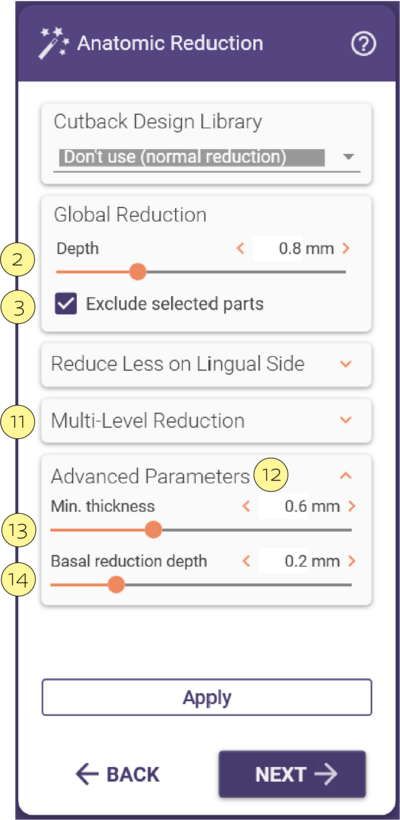
- You can adjust the minimum thickness within the parameters defined for the material in the Advanced Parameters [12] by using the slider Min. thickness [13]. Here, you can also set a different reduction depth for bottom parts using the slider Basal reduction depth [14].
Click Apply to perform the reduction. The full anatomy will be displayed transparently, with the reduced geometry opaque beneath it.


