Emboss with Image or Text. Useful for placing logos, labels, or very custom stipple patterns on large areas of mesh. To use, Select the mode (image or text), Adjust the parameters (width/depth, embosss, and de-boss), click the cursor to place, and click Apply.

- Select Image [1] - Selects an image to emboss. If the area to be embossed is larger than the image size, the image will be repeated in both x and y as required. A 1:1 blue proposal will be created. Left click to place the proposal on the model.
- Select Text [2] presents a dialog box, see text settings below. When updated, a 1:1 blue proposal will be created under the cursor. Left-Click to place the proposal on the model.
- Invert Image [3] inverts text and background areas in the image or text proposal.
- Mirror [4] the emboss pattern left to right.
- Width [5] sets the overall width of the text or image to be embossed. The aspect ratio is fixed by the text proposal.
- Emboss [6] sets the mode to emboss (i.e. add to the surface of the existing wax).
- De-Boss [7] sets the mode to deboss (i.e. subtract from the surface of the existing wax)
- Depth [8] the depth to emboss or de-boss the image or text.
- Falloff [9] use this control to soften the edges. You likely don't want to use this for text. But definitely do want to use it for patterns.
- Preview the emboss [10] shows a wax preview of the effect of the emboss/deboss operation.
- Clear [11] undo the operation.
- Apply [12] Converts the blue proposal to wax. Control-Z to undo.
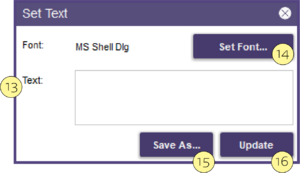
Text Settings
- Enter text in Text: [13] box, you can enter multi-line text using "Enter"
- Set Font... [14] if required. Adjust the Font, Style, the rest of the controls have no effect.
- Click Save As... [15] to save frequently used text as an image for next time. It is saved as a black and white image (.bmp format) in the PartialTechPreview\Patterns folder.
- Click Update [16] to update the blue proposal under the cursor.
Close the text settings box to dismiss the settings window.
| Some text may be too small to be read. Always check the result to make sure the text is legible, especially over stippled areas. |
| Use the Mask tool in conjunction with this tool to limit the area of the embossed image. |


