This tool sequentially applies clasps (and minor connectors) to one or more open curves. To use, select the clasp type [1] to [5], then click on the curve(s) associated with that particular clasp type. Once all the curves have been clicked, a gray preview will appear. Adjust the points on the curve and the Settings... dialog to get the precise clasp contour you need. Then click "Apply" to convert the proposal to wax. You can save and recall specific clasp profiles using the editor, and recall them later.
Select Clasp Type and Profile
- Single Curve Clasp [1] used for ring and bracing clasps
- Dual Curve Clasp [2] used for Akers (opposing) clasps on the same tooth.
- Dual Curve "J" Clasp [3] used for single point approach arms. Click the approach arm curve first, then the single clasp segment
- Dual Curve "T" Clasp [4] used for dual-clasp approach arms. Click the approach arm curve first, then each of the 2 clasp segment
- Triple Curve "T" Clasp [5] click on the approach arm curve first, then on each clasp segment once
- Select from a list of clasp profiles [6] in the drop-down list. Once selected, a preview of the clasp will appear.
- Create or edit your own clasp profile in the Profile Editor [7]
- Flip [8] an existing clasp profile upside-down (i.e. mirror top to bottom along the midpoint of the clasp curve).
- Rotate [9] an existing clasp profile 180 degrees (i.e. inside and outside become reversed)
- Settings... [10] allows you to adjust the taper and offset of each clasp
- Clasp smoothing [11] select a value to smooth the clasp surface. A higher value defines a smoother surface.
- Apply [12] to accept the selection.
| Don't forget to change Clasp Type before selecting curves on the model |
Adjust Clasp Position and Taper
Adjust the position of the clasp by left-clicking the edit points on the curve of the clasp. You can use the undercut color scale and the length of clasp in the undercut region to precisely set the amount of retention for that particular clasp.
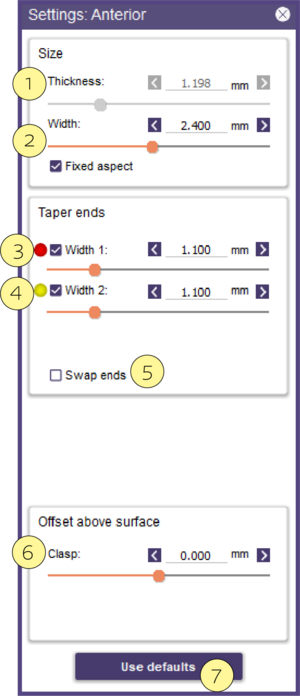
The selected clasp profile is displayed in a menu with the settings:
- Defines basic clasp Thickness [1] from the model, and Width [2] along the surface of the model. Depending on the profile settings, one or both can be grayed out.
- Width 1 [3], and Width 2 [4] control the taper of the clasp by defining specific widths along the curve. As you enter each number, the preview is updated. You can turn off any tapering of a particular clasp curve by un-checking the box.
- Use Swap Ends [5] to reverse the end of the curve that the modified widths refer to.
- Clasp [6] is used for I-bar single curve clasps, where the entire clasp must float above the gingiva and tooth. Use Clone to extend the tip to make contact with the tooth in the undercut.
- Use Defaults [7] will revert all of the settings to their default values.
| For Approach arm clasps, remember to draw the approach arm section first |


