Contents
Overview
After drawing appropriate curves for your Finish Lines (as explained here) you sequentially apply one or more finish lines to these curves.

The method to apply a finish line is to select the profile, then select the curve associated with that particular profile, creating a live preview. Once the preview is visible adjust the position and settings or use the interactor to adjust the finish line angle. When you are satisfied with the finish line, Apply it to commit the finish line preview to wax. Repeat for each finish line. You can perform final smoothing in this step as well.
- Profile [1] Selects the cross-sectional profile of the selected finish line curve.
- Create or edit your own finish line profile in the Profile Editor [2]
- Flip [3] an existing finish line profile upside-down. This will only have an effect for non-symmetrical profiles.
- Rotate [4] an existing finish line profile 180 degrees.
- Settings... [5] allows you to adjust the size, height, and taper the ends of the finish line
- Preview [6] displays a preview of the finish line and allows to make changes.
- Clear [7]after preview, allows you to clear the current finish line.
- Apply [8] commits the current preview to wax.
Creating Custom Finish Line Profiles
You can create custom finish lines by using the profile editor. This is explained in an online video.
Adjust Finish Line Position and Taper
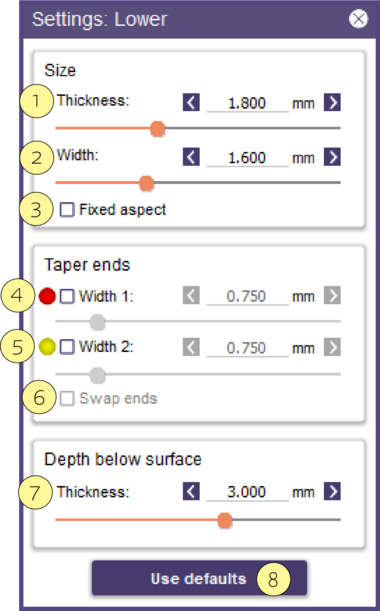
With the settings window visible, displaying the selected profile, adjust the position of the finish line by left-clicking the edit points on the curve, and the parameters in the settings window:
Size
Defines basic Thickness [1] or height, and Width [2] of the finish line proposal. Fixed Aspect [3] keeps thickness and width in a constant proportion.
Taper Ends
Width 1 [4] and Width 2 [5] control the length of taper on each end of the finish line by defining the ending width. You can turn off tapering on a Finish Line by un-checking the box. Use Swap Ends [6] to reverse the end of the segment that the selected taper refers to.
Depth Below Surface
Thickness [7] refers to the height of the base of the finish line, and should be adjusted so the bottom of the finish line completely intersects the mesh/clone/major connector areas.
Use Defaults
Use Defaults [8] resets all settings to their default values


