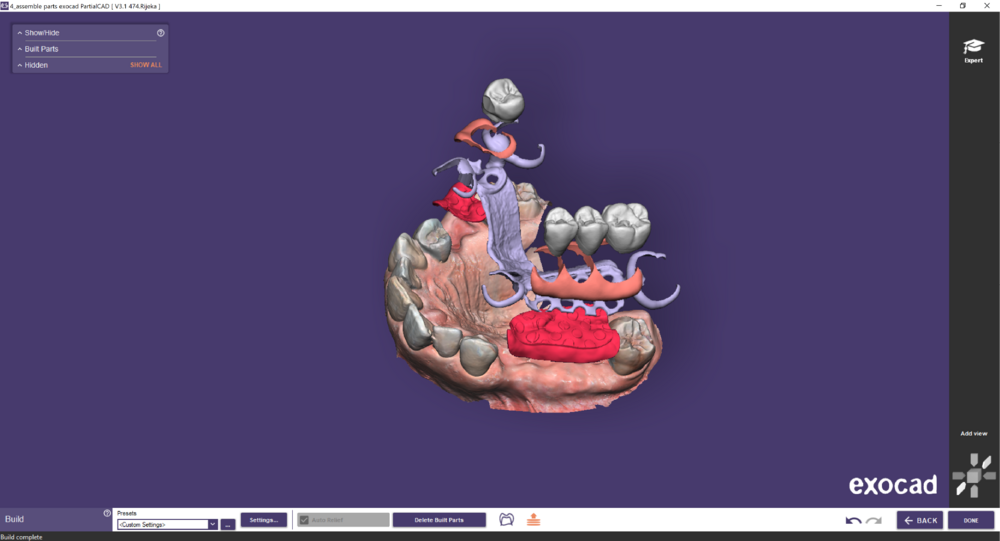
In this step, you will prepare the design for final output, and save the final design.

- Presets ... [1] Edit the presets list.
- Settings... [2]Relief parameters (which adjust for scanning smoothness) are adjusted here.
- Auto Relief [3] Improve Built part fit with automatically generated relief.
- Apply Build [4] Please be patient, as this process can take a couple of minutes, with a progress bar. The resulting partial framework mesh is displayed over a transparent model, so you can see the underside. The output files will be placed in the project directory, or whatever directory the original scan/project or scene file was loaded from.
- Cut view [5] displays sectional views of your design.
- Exploded view [6] Toogle an exploded view of the Build Parts (press CTRL to group Teeth with Gingiva). Below you can find an example:
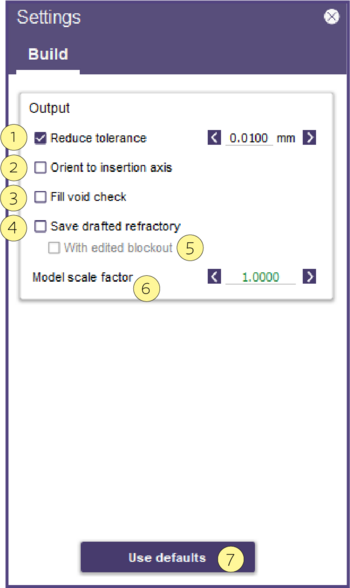
- Reduce tolerance [1] When converting wax to final mesh, the maximum error between the wax and the output mesh. Affects the output file size, lower tolerance means a larger file size. Un-checking the box means maximum file size.
- Orient to insertion axis [2] The output file will be rotated with the path of the insertion set to the -z axis. Mostly used to ensure accurate 3D printing.
- Fill Void check [3] Due to the nature of digital wax, it occasionally creates a "bubble" inside the model, which will generally not be visible. Rarely used, and slows down save-for-build.
- Save drafted refractory [4] This checkbox saves the drafted refractory with the additional option to save with the edited blockout. Relevant if you want to export just a closed refractory model; others want to export the blockout with any edits. In that case, select the checkbox [5].
- Model scale factor [6] Amount of relief.
- Use defaults [7] will use the default values.
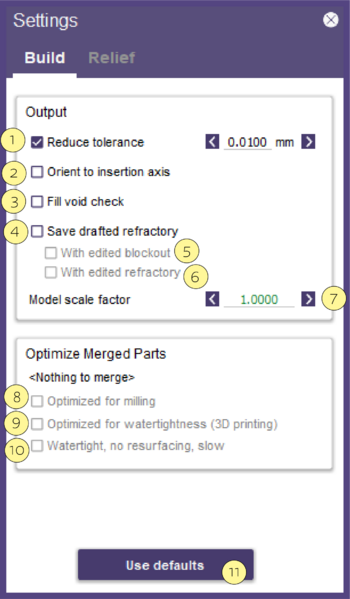
Expert - Settings - Only make changes if you are certain about it, otherwise, we recommend keeping the default values.
- [1] Reduce tolerance When converting wax to final mesh, the maximum error between the wax and the output mesh. Affects the output file size, lower tolerance means larger file size. Un-checking the box means maximum file size.
- [2] Orient to insertion axis The output file will be rotated with the path of insertion set to the -z axis. Mostly used to ensure accurate 3D printing.
- [3] Fill void check Due to the nature of digital wax, it occasionally creates a "bubble" inside the model, which will generally not be visible. Rarely used, and slows down save-for-build.
- [4] Save drafted refractory This allows saving relief to blockout (normally the relief applied to blockout is discarded), With edited blockout [5] or With edited refractory [6]
- [7] Model scale factor Amount of relief.
- [8] Optimized for milling will create an output file that may contain multiple individual meshes that intersect each other. For milling, this is no problem, and it's also OK for most printers.
- [9] Optimized for watertightness will create a single shell closed mesh, with no internal surfaces. But there will be a slight loss of accuracy for imported parts (such as crowns).
- [10] Watertight, no resurfacing, slow will create a single shell closed mesh, with no internal surfaces, while preserving the original triangulation of all parts (no loss of accuracy) - but takes more time to calculate.
- [11] Use defaults will use the default values.
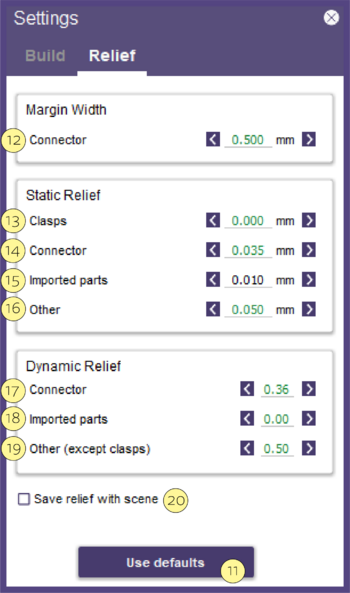
Relief
Margin Width
- [12] Connector value controlling relief under the connector.
Static relief Constant offset.
- [13] Clasps value controlling relief under the clasp.
- [14] Connector value controlling relief under the connector.
- [15] Imported parts value controlling relief under the imported parts.
- [16] Other value controlling relief under other parts.
Dynamic Relief detecting areas that maybe need a little extra relief.
- [17] Connector value controlling relief under the connector.
- [18] Imported parts value controlling relief under the imported parts.
- [19] Other (except clasps) value controlling relief under other parts.
- [20] Save relief with scene This allows to save relief to blockout (normally the relief applied to blockout is discarded).


