Contents
Overview
If the type of construction allows for a virtual waxup to be designed, DentalCAD will enter the Virtual Waxup Wizard step.
A virtual waxup is not allowed for veneers and inlays. Crowns need to have a defined crown bottom before you can design a virtual waxup.
In the first preparational step for the virtual waxup design, you define the bottom of the virtual waxup.
Properties
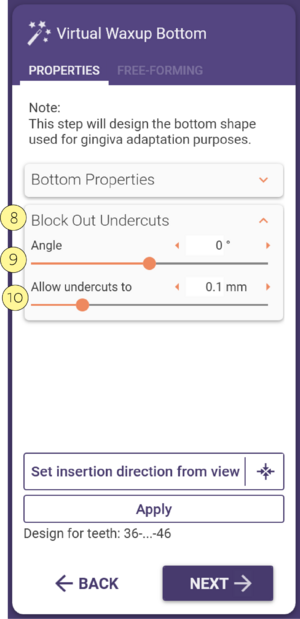
The Virtual Waxup Bottom window consists of two expandable major sections: Bottom Properties [1], and Block out undercuts [8]. When the Bottom Properties section [1] is expanded, the following sliders are available:
- Offset [2]: specify the offset between the virtual waxup and the scanned jaw.
- Smoothing [3]: specify the amount of smoothing to be applied to the virtual waxup bottom.
- Milling Diameter [4]: specify the diameter of the milling tool.
In the lower section of the Virtual Waxup Bottom window, you can specify the insertion direction of the virtual waxup: Click on Set insertion direction from view [5] to set the insertion direction to your current view; click the compass icon [6] to set the view to the current insertion direction. Alternatively, you can click and drag the green arrows in the main view to change the insertion direction.
When the Block out undercuts section [8] is expanded, you can define the angle in relation to the insertion direction that
is applied to block out undercuts by adjusting the slider Angle [9]. You can also specify the maximum size of undercuts by adjusting the slider Allow undercuts to [10].
When you are done setting up the virtual waxup bottom design, click the Apply [7] button to generate the virtual waxup bottom with your selected settings.

Free-Forming
After generating the virtual waxup bottom, the Free-Forming tab in the Virtual Waxup Bottom window becomes active. You can use the basic free-forming functions to virtually add/remove material and smooth the surface. Select the desired action by using the buttons Add/Remove [1] and/or Smooth/Flatten [2].
- To add/remove material: Hold the left mouse button on the tooth to add material. To remove material, additionally hold SHIFT.
- The longer you hold the mouse button, the more material will be added/removed.
- To smooth/flatten rough areas: Hold the left mouse button on areas you want to smooth. To flatten material (super smoothing), additionally hold SHIFT. For a more shape-preserving smoothing, hold CTRL.
Using the slider Strength [3], you can adjust the amount of material that is added/removed, or the amount of smoothing when in Smooth/Flatten mode. Using the slider Brush size [4], you can define the size of the area that is affected around the cursor. There are three brush types available in the Type drop-down menu [5]: Default, Point of knife, and Cylinder.
When satisfied with the design, you can click Next to proceed to the next Wizard step.


