Telescopic crowns


Overview
The design of telescopic crowns is controlled via control points, that are moved with the mouse.

| Mouse interactions & hotkeys for telescopic crown function |
You can move the control points (the small balls) by dragging them with left mouse button. You can also drag the arrows, for restricted movement in one direction.
| Ctrl+Click | Add Control Point |
| Drag Point + Right click | Remove control point |
| Shift+Drag | move point and its neighbors on the same side of the telescopic crown |
| Ctrl+Drag | move all points all around together |
| Ctrl+Shift+Click | insert additional control line |
| Ctrl+Shift+pressed left mouse key+right Click | Delete a control line |
Usage of the UFO / Hat / Tooth icon
When you move the mouse pointer near the center of a segment (which is delimited by four surrounding control points), a small icon spawns. Depending on the state of segment, it either shows:

- A hat - this segment is friction surface
- An UFO - this segment has a conical shape
- A tooth - this segment has full anatomic shape
Click the icon to toggle between state, for this segment. Hold <Ctrl> to toggle all around.
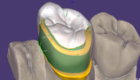
Using this feature, complex semi-telescopic/semi-anatomic designs are possible:

Deepening the upper surface area
To deepen the surface area (push it down, to gain more space), Ctrl+Shift-click on it to add an additional control point, which you can move up or down to control the height. If you add a second control points here (by Ctrl+clicking), they will be connected through a pink line, which will also pull up/down the surface when moved:

Clicking the toggle disc below these control points will keep them positioned at the lowest possible point (with regard to minimum thickness).

- Use the slider [1] to adjust the angle of the telescopic crown.
- Modify the diameter using the slider [2].
- Under [3] Stick options, select which part to attach: Crown, Gingiva, or None.
- Enable the checkbox [4] Visualize areas with friction to activate color feedback. Friction zones will be highlighted in green.
- Expand [5] Angle adjustment to fine-tune the telescopic angle for the Mesial, Buccal, Distal, or Lingual sides.
- In the Insertion Axis [6] section, choose either Default or Set from View to define the insertion axis.