In this step, you apply major connector, meshes, and Split gingiva in one step.
![]()
- Settings [1] See below. Allows you to choose parameters for the Mesh, the Connector, and the Split Gingiva.
- Create Checkboxes... [2], [3] and [4] allows you to un-check to disable Major connector, Mesh generation, and the Splint Gingiva in this tool.
- Preview [5] shows you the proposed result of the generation step using the current settings, without committing to the result
- Clear [6] clears the current major connector and mesh proposal
- Apply [7] commits the current major connector and mesh results to beige wax
- Cut view [8] displays a sectional view of your design
| Cut view hotkeys Use the slider to change the slice position. Left mouse button to draw a ruler (press CTRL key for multiple rulers). Right mouse button to rotate the cut plane around Y. Right + left mouse buttons to move the cut plane in X and Y. Use the thumb wheel to zoom the cut plane. |
Settings
Mesh
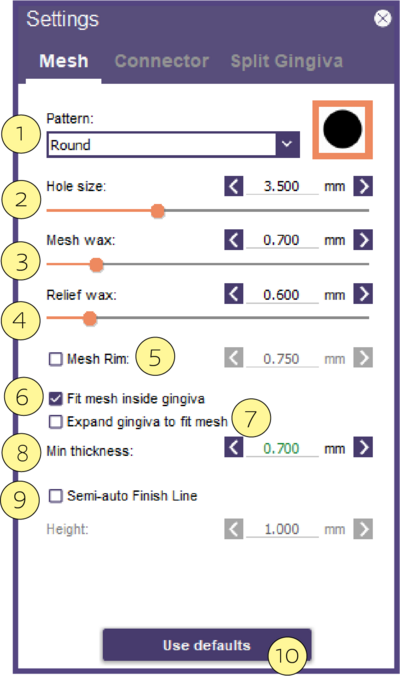
- Pattern [1] Allows you to select from a number of hole patterns from a drop-down list.
- Hole Size [2] Sets the hole size for the mesh hole pattern. Alternatively, the hole size can be controlled by selecting and dragging the arrow of the mesh
- Mesh Wax [3] Sets the thickness of the mesh itself, beginning at the top of the relief wax
- Relief Wax [4] Sets the offset from the top of the refractory model to the bottom of the mesh
- Mesh Rim [5] Creates a rim around the mesh
- Fit mesh inside gingiva [6] forces the wax of the mesh connector after it's created to fit inside the gingiva
- Expand gingiva to fit mesh [7] ensures the retention mesh doesn’t protrude from the chosen wax part (typically the Gingiva), you can either crop the mesh within the part surface or expand the part to accommodate the retention mesh by the specified amount.
- Min. thickness [8] amount of offset related to [6]
- Semi-auto Finish Line [9] uses the edge of the gingiva and converts it to a finish line. If selected, choose the height of the finish line.
- Use Defaults [10] to reset to default values.
Connector
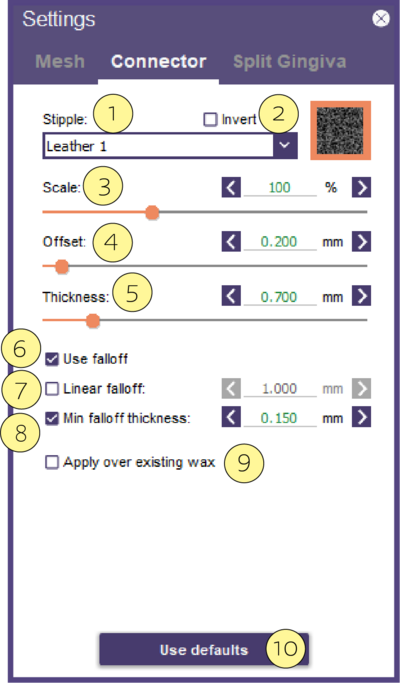
- Stipple [1] A drop-down list of stipple patterns to be applied to the surface of the major connector.
- Invert [2] Checkbox that inverts stipple pattern on apply.
- Scale [3] The horizontal scale for the stipple pattern. A larger value will expand the pattern to cover a larger area.
- Offset [4] The vertical thickness of the stipple, on top of the base thickness value. Adjust the depth of the stippling in the overall thickness of the major connector.
- Thickness [5] The vertical thickness of the major connector, not including stipple pattern thickness.
- Use Falloff [6] Checkbox so falloff can be completely disabled.
- Linear Falloff [7] The falloff angle is to be applied at the edges of the connector. A larger value will yield a smoother transition and a slightly wider major connector.
- Min falloff thickness [8] Minimum thickness
- Apply over existing wax [9] Activate the checkbox to place the connector on top of existing wax.
- Use Defaults [10] reset to default values.
Split Gingiva applies ONLY to Quick snap workflow
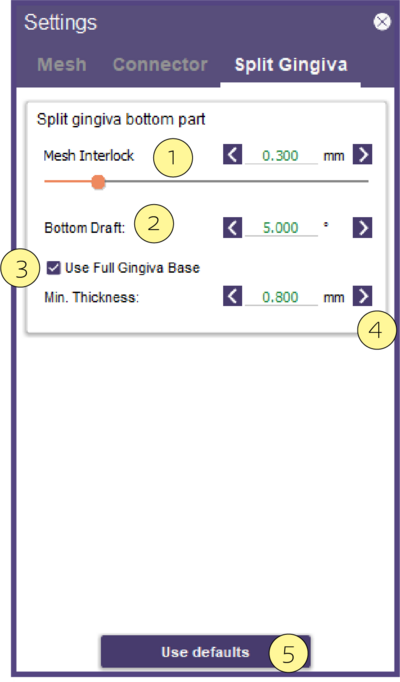
- Mesh Interlock [1] how much bottom gingiva goes into the mesh, overlaps with the mesh
- Bottom Draft [2] retention mesh drafted insertion direction to pull in and out.
- Use Full Gingiva Base [3] an extension of the bottom to avoid touching the gingiva of the patient. Keep the gingiva and bottom away from the tissue.
- Min. Thickness [4] adjust the value of the minimum thickness
- Use defaults [5] reset to default values.


