In this step, we draw the lingual bar for the lower partial.

- Select from a list of bar Profiles [1] in the drop-down list. Once selected, a preview of the bar will appear.
- Create or edit your own bar profile in the Profile Editor [2]
- Flip [3] an existing bar profile upside-down. This will only have an effect for non-symmetrical bar profiles.
- Rotate [4] an existing bar profile 180 degrees
- Capped Ends [5] create rounded corners for your lingual bar to blend into adjoining parts of the partial.
- Settings... [6] allows you to adjust the sizing and features of the bar numerically
- Profile Orientation [7] selects if the bar profile is oriented towards the Refractory (default) or to the Curve Tangent
- Bar smoothing [8] select the amount of smoothing you would like to apply, a larger value will create a smoother surface
- Clear [9] to undo the applied settings to the bar
- Apply [10] Commits the current bar preview to wax.
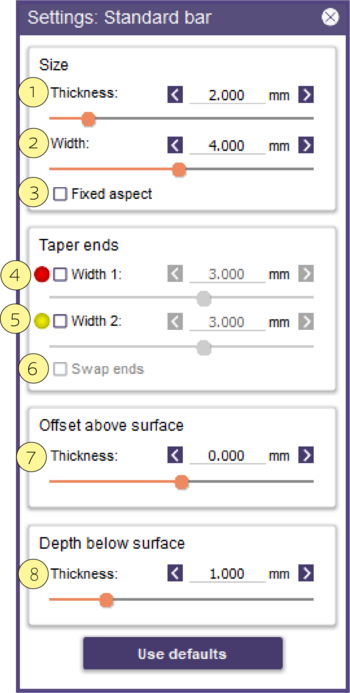
Settings
- Size
Defines basic Thickness [1] and Width [2] of the Bar. Fixed Aspect [3] fixes the thickness and width to be identical.
- Taper Ends
Width1 [4] and Width2 [5] control the length of taper on each end of the bar by defining the ending width. You can turn off tapering on either end by un-checking the box. Use Swap Ends [6] to reverse the end of the ends that each taper value refers to.
- Offset Above Surface
Allows the Thickness [7] to be increased for offsetting the bar some distance above the refractory model
- Depth Below Surface
Allows the Thickness [8] below the bar surface to be extended, and should be adjusted so the bottom of the finish line smoothly intersects any connected wax areas.


