Library setup for immediate load workflow


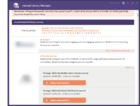
Step 1: Start by downloading the implant libraries used for planning [A], here. After selecting, fill out the form [1] with the required information and click ‘’Get download link by email’’. A "Request sent successfully" message appears [2] and after some moments you will receive an email with the links to download the libraries [3].
 After downloading, do not forget to unzip the compressed folders.
Step 2: Install the libraries you've downloaded in the following location DentalCADApp/library/implant.
Check the document, How to install libraries for further information.
Step 3: Click here to download the compatible prosthetic library (DentalCAD library) [B], which contains Ti-bases, pre-milled blanks, etc. After selecting, fill out the form [1] with the required information, and click ‘’Get download link by email’’. A "Request sent successfully" message appears [2] and after some moments you will receive an email with the links to download the libraries [3]. To check the compatibility between the exoplan implant library and the Immediate Load workflow please check the following documents exoplan Supported Libraries and Prosthetic Component Libraries. You can also take a look at the exoplan Guide Creator Supported Surgical Workflows.
 After downloading, do not forget to unzip the compressed folders.
Step 4: Install the compatible components libraries (DentalCAD library) you've downloaded in the following locationDentalCADApp/library/implant. Check the document, How to install libraries for further information.
Step 5:Additionally, you can use the library manager to install DentalCAD libraries. See the video below for further information.
| Please contact your reseller for further information on this topic. |