Contents
Overview
This page documents the setup for integration between Connect Case Center Inbox and exocad DentalDB/, to automatically import cases coming from intraoral scanners in the lab. Supported scanners on the dentist side include Sirona BlueCam, OmniCam, and Dentsply Sirona Primescan. For this integration to work, you need a license of the Connect Case Center Inbox, which is available from Dentsply Sirona. Note: Your doctor may have received a bundled license for their partner lab, if the intraoral scanner was purchased recently.
What you'll get
Once the integration is properly set up, cases sent from the doctors through Dentsply Sirona Connect to your lab will be automatically added to your case list in exocad, without needing to manually importing them. You will be notified of newly arrived cases with a pop-up notification from exocad DentalDB. Aside from the scan data, additional information like the selection of indication, material selected, etc will also be transferred automatically.
Setup
The following steps only need to be done once, for the initial setup.
What to do in the Connect Case Center Inbox
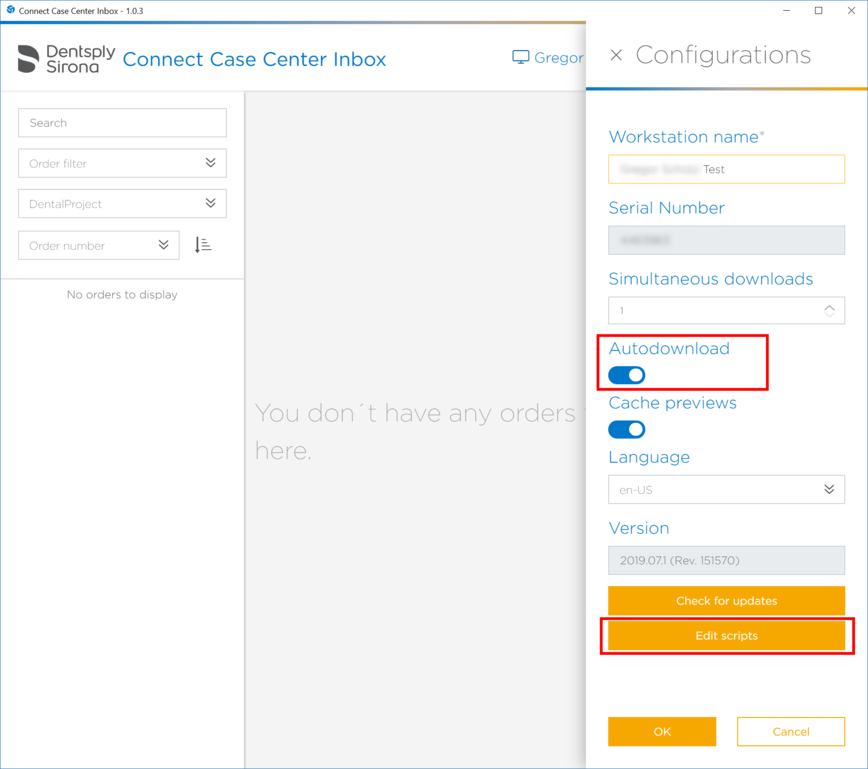
1. Log in to Connect Case Center Inbox. From the main screen, click the gear icon to open the settings screen:

2. On the settings screen, make sure that "Autodownload" is enabled. Then, click on "Edit scripts".

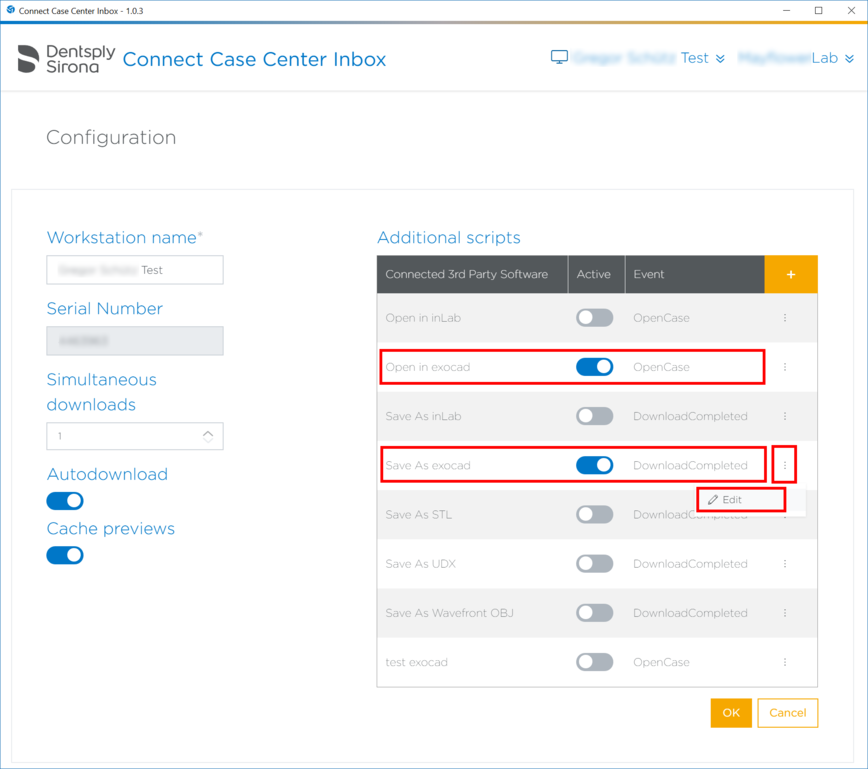
3. Make sure "Open in exocad" and "Save As exocad" are enabled. Then, click the "..." icon next in the "Save as exocad" line; in the menu that opens, click "Edit":

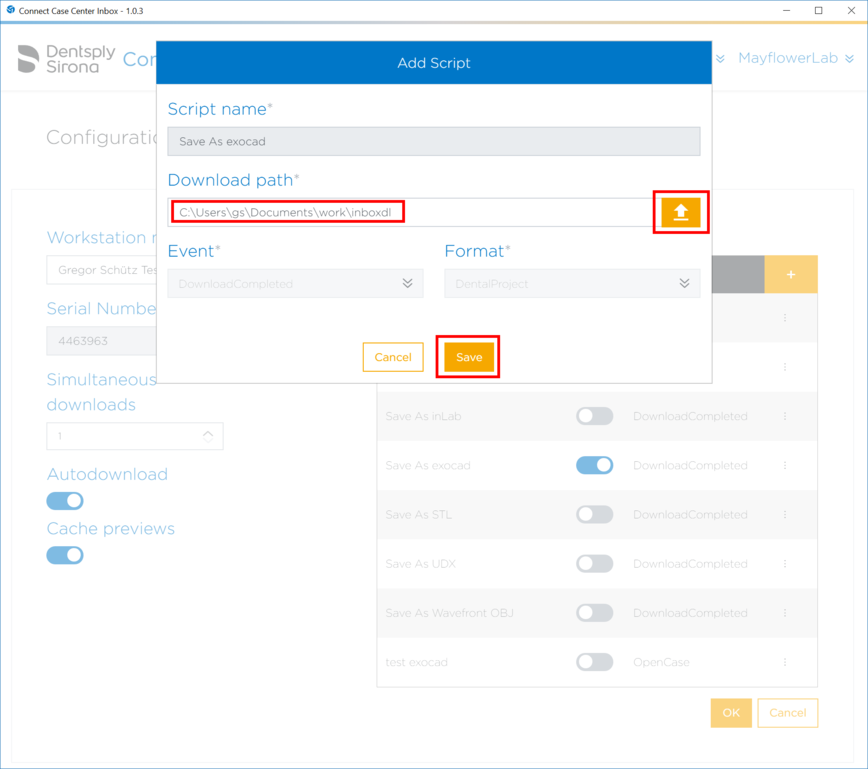
4. In the dialog that opens, click the "arrow up" icon to chose a path where your Windows user has write permissions. You may want to create a new directory for this purpose - e.g. "c:\users\<username>\Documents\work\inboxdl". When done, click "Save", and then "OK" in the configuration dialog:

What to do in the exocad DentalDB configuration
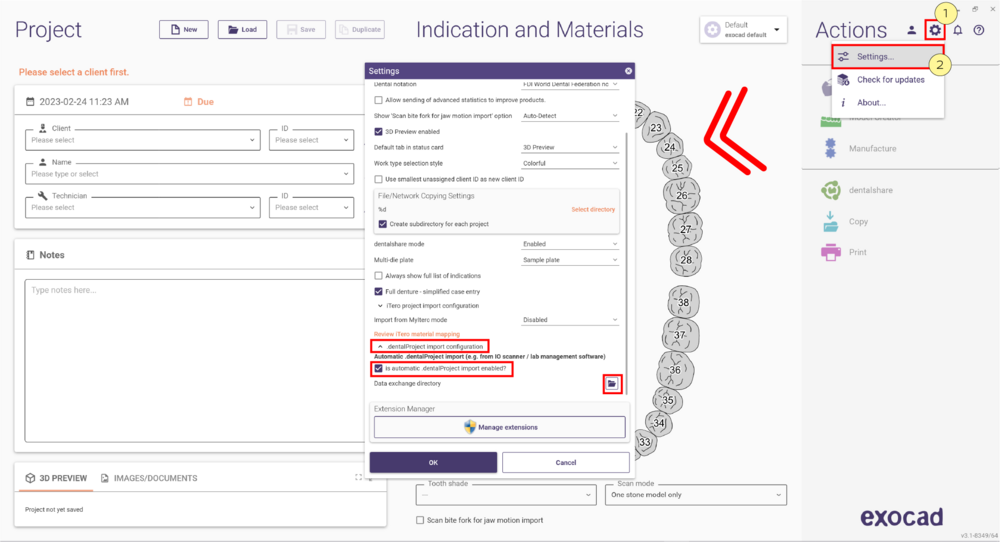
In exocad DentalDB, click [1] and Settings [2]. Unfold "dentalProject import configuration", then check "is automatic dentalProject import enabled".
Then, click the folder icon next to "Data exchange directory", and chose the exact folder you have previously defined in the Connect Case Center Inbox - e.g. "c:\users\<username>\Documents\work\inboxdl":

Click "OK" to confirm. Automatic import should now work any time that both Connect Case Center Inbox and exocad DentalDB are running.
Understanding & troubleshooting material mappings
In the dentist's scanning software, a multitude of materials is available. However, the list of materials on the dentist's computer may differ from the list of materials available on your CAD/CAM system. A mapping between the materials available in the scanner software, and the materials available for your production system can be configured by your exocad reseller. For example, "Gold" will typically not be milled directly in a dental lab or practice, but many machines can mill wax, which is then suitable for casting gold. So, a useful configuration option would be to map "gold" to "wax" for CAD/CAM purposes.
- If no material mapping is defined at all for a particular material defined by the doctor in the scanning software, the DentalDB software will notify the user about this fact, and will fall back to a default material (typically Zirconia).
- Your exocad reseller controls the material mapping through his exocad configurations. If your configuration has incorrect or missing material mappings, please report these and have them fixed.
Getting help and support
For any questions about Connect Case Center Inbox, please contact your Dentsply Sirona support. For questions about exocad DentalDB configuration, including material mapping, please contact your exocad reseller.
Additional Copyright notice
This page contains screenshots from software copyrighted by Dentsply Sirona. Please note that the standard licensing conditions of the exocad Wiki do not apply to these screen shots.


