Adapt to antagonist / adjacent


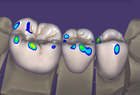
Adapting to occlusion and adjacent (proximal).png) This screen allows you to adapt restorations to the antagonist (if scanned), and to the adjacent teeth. If you have used the Virtual Articulator feature (available as an add-on module; requires supported scanner for a direct facebow transfer or you can manually set the occlusal set using Bonwill's triangle), you may chose between static or dynamic occlusion [17]. You can define a desired distance to the antagonist (for anatomic and reduced parts) using the slider(s) desired distance [16]. For the actual adaptation, you have the choice between a smart shape-preserving adaptation [15], which will try to preserve the tooth morphology, or simply cutting intersections with the antagonist, cut intersection [14]. To adapt to anterior teeth, switch to Approximal [13]. |
| Use a combination of both – first the shape-preserving adaptation [15], which will keep small intersections, then cut intersections [14]. |
On approximal adaptation, you can define a distance from the designed anatomy to the adjacent teeth and emergence profile using the desired distance sliders.
- Disc cutter places discs at the end of restoration, aligned with the insertion axes of each tooth. • This can be used to create flat areas in the region of your proximal contact points. Add more discs, by clicking Add discs. Using the blue arrows, you can tilt the discs to create a flat interproximal region, which ensures the proper insertion of the restoration. Use the Disc thickness to apply a gap to your proximal contact points. You can orient the disc towards a specific tooth axis or align to the disc to the view direction. Delete discs with Left and Right button or to use the button Remove all.


| Hold the Left Mouse button on the disc, to change the position.
Hold SHIFT to set the control point of the disc to the desired position of the scanned surface.
|
- When Block out neighbor collisions is checked, the scanned approximal neighbouring teeth are temporarily blocked out relative to the tooth insertion direction, to allow a collision free fitting. Desired distance can be selected by the slider.


| To adapt Maryland bridges, use feature Block out neighbor collisions. The software cannot distinguish between neighboring tooth and gingiva, and incorrect adaptation can be avoided with using Block out neighbor collisions. |


- You can check Pull sideways to adjacent teeth to move the restoration borders sideways so that they are in contact with the adjacent teeth. If checked, you can define intrusions with the adjacent teeth using the slider Intrusion depth before cut. These intrusions will be applied before intersections are cut away.

- You can paint areas on the model teeth which will be excluded from adaptation by selecting Exclude selected parts.

| Click Cut all intersections, will cut all intersections with the antagonist, adjacent and for pontics or wax-ups, to the gingiva. |
Adapting pontics to the gingiva.png) Using the "Pontic" tab, you can adapt pontics to the gingiva. The Desired Distance [21] slider controls the distance to the gingiva after the adaptation:
|
Finally, click Adapt to gingiva [20] to perform the actual adaptation.