Contents
Overview
The WorkParamConfigTool (exoMaterialConfigurationEditor) is designed to create and modify exocad material configuration (WorkParamsDB.xml) files. These files have a complex structure, this structure requires a special software tool to make changes. This tool is not intended for use by end-users due to the complexity of editing material configurations and also due to the unexpected consequences that can arise during post-processing due to incorrect configuration. We recommend using this tool with caution.
The action menu contains the following items:
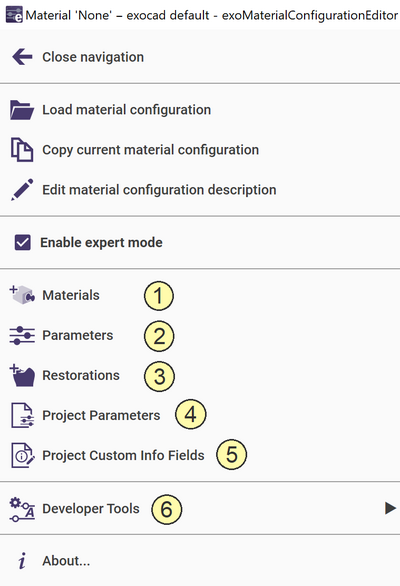
Open navigation [1]: opens a navigation submenu.
Load material configuration [2]: loads available material configurations from ..\\DentalDB\config directory.
Copy current material configuration [3]: copies current material configuration to the new one and allows to change the name and add a custom description to the new material configuration.
Edit material configuration description [4]: allows to edit the displayed name of current material configuration.
About... [5]: displays information about this tool.
Expert mode
To enter expert mode open navigation and enable expert mode checkbox.
Expert menu:
Materials [1]: allows to add, remove, and edit materials, material-specific parameters, images, material defaults, and material properties.
Parameters [2]: allows to add, remove, and edit global parameters and define global defaults.
Restorations [37]: allows to edit restoration-specific properties, e.g. allow connectors, gingiva scan, multi-die etc.
Project Parameters [4]: allows to add and remove project-specific parameters.
Project Custom Info Fields [5]: allows to add, edit, and remove project-specific custom information fields.
Developer tools [6]: reserved for developers only.
Creating your own material configuration
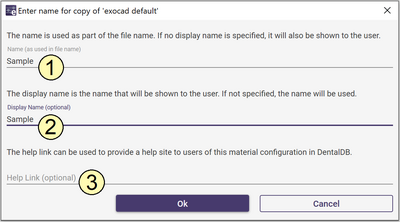
The best way to create your own material configuration is to copy, rename and adjust a generic material configuration. To do this, click Copy current material configuration button and fill the fields Name [1], that means the suffix to be added to the WorkParamsDB.xml file name, e.g. -Sample, Display Name [2] (optional), which is the name that will be shown to the user. If not specified, the Name [1] will be displayed. Optionally you can add an internet link [3] to the help page.
Creating new material
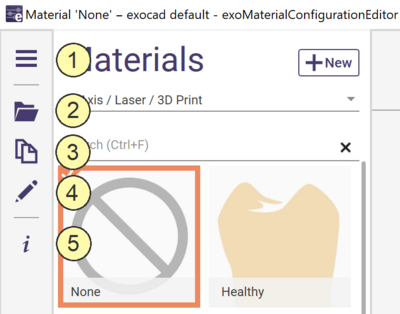
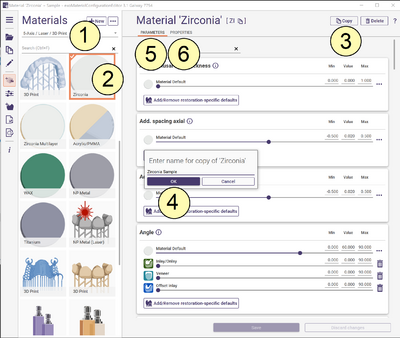
The best way to create your own material is to copy, rename, add an image and adjust parameters using the generic material. To do this, go to Materials, select the axis [1], select the material [2], and click the Copy [3] button. You can now enter a name for your new material [4]. Finally, you can adjust the material-specific parameters of your choice [5], and the material properties [6] (e.g. Displayed name, Image, and Available restorations) on the second tab. If the material-specific parameter is not used, the software uses the global parameter, see next chapter. Please note, the material property called material class describes a physical type of material like wax, metal, ceramic etc. If you have e.g. a wax blank, this blank should have a class wax. This property is required for integration purposes, e.g. during the import of .dentalProject file from intraoral scanner software to map materials. This information is not yet mandatory but it will probably become mandatory in the future. Remember to press the Save button to complete the process.
Editing global parameters
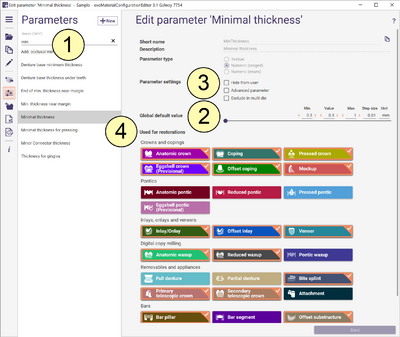
If no global parameter is entered in the material configuration, DentalCADApp uses the parameter from the defaultparameters.xml file. Global parameters from material configuration have higher priority than defaultparameters (they override defaultparameters). To edit global parameters, click Parameters, check the parameter list or search for desired parameter [1], choose the parameter and edit Global default value [2] (Min, Value, Max, etc.). You can adjust Parameter settings [3], e.g. hide some specific parameter from user or mark it as an Advanced parameter and choose for which restorations is this parameter available [4]. Remember to press the Save button to complete the process.

